Configure SQL transactional replication
ADMINISTRATORON-PREMISE ONLY
Important
Database replication requires the appropriate SQL Server licensing; your organization is responsible for procuring and managing that license.
Warning
After upgrading your FactoryLogix production database to the latest FactoryLogix release, be sure to test it with database replication. In some cases, you may be required to recreate database replication—including recreating all snapshots.
Prepare SQL Server for replication
The Microsoft Windows Tutorial for Preparing SQL Server for Replication can be found https://learn.microsoft.com/en-us/sql/relational-databases/replication/tutorial-preparing-the-server-for-replication?view=sql-server-ver17. Be sure to review the tutorial before proceeding with the instructions in this topic.
Create Windows accounts for replication
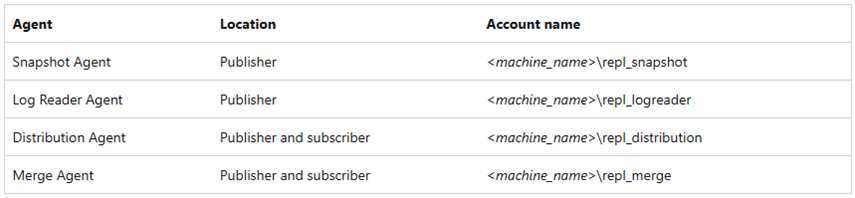
Windows accounts (or Active Directory accounts) are required for the replication agents on both the FactoryLogix server (publisher) and the reporting database server (subscriber). These accounts require local administrator permissions for the respective servers—they can be accounts already used by administrators or new Windows accounts that you create. If creating new accounts, the following illustration shows the accounts that will be required:
Prepare the snapshot folder
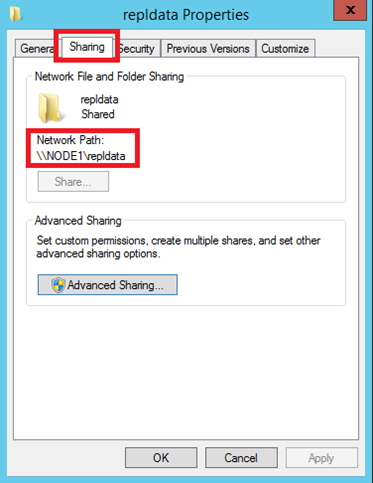
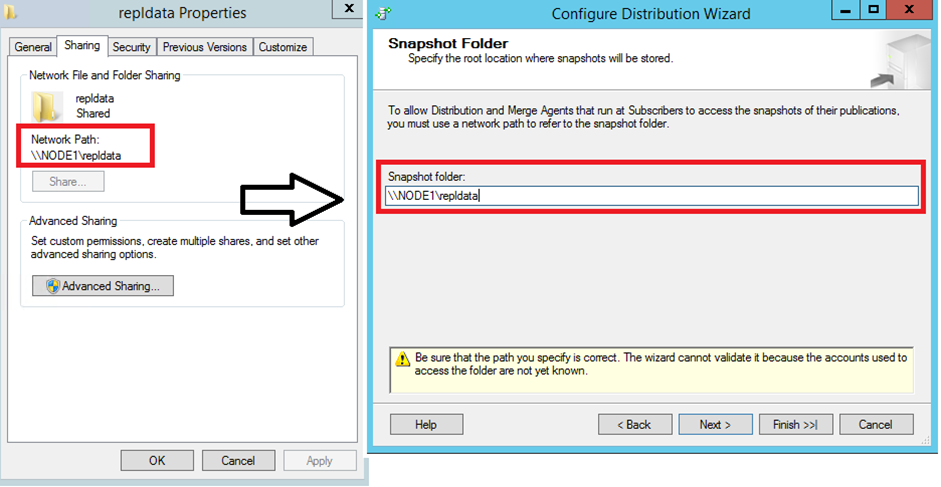
Create a folder named repldata. This folder will be utilized by the replication agents to create and house the snapshot from the publisher database (FactoryLogix production database). The folder can be located and shared from any network location as long as all four of the Windows accounts, created in the previous topic, or the administrator accounts to be used have full access and control to the folder share. The network location must be accessible from both the FactoryLogix server and the reporting database server.
Configure distribution
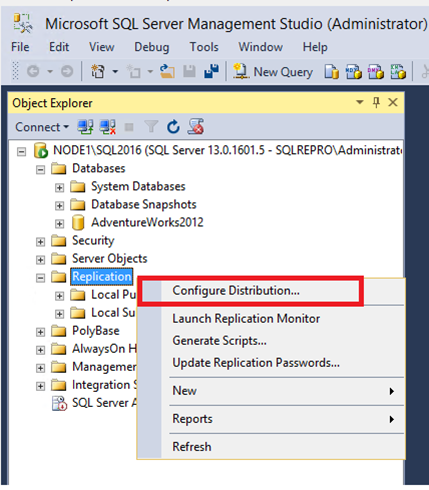
Open SQL Server Management Studio (SSMS) as an Administrator, then connect to the FactoryLogix database server.
Right-click the replication folder you created in Configure SQL transactional replication | Prepare-the-snapshot-folder and select Configure Distribution.
Important
If the replication folder is not present, the replication feature is not installed for this SQL Server and must be installed before proceeding: https://learn.microsoft.com/en-us/sql/database-engine/install-windows/install-sql-server-replication?view=sql-server-ver17.
If the SQL Server Agent is not running, a pop-up displays, prompting you to configure the SQL Server Agent to start automatically. Select Yes, configure the SQL Server Agent service to start automatically, then select Next.
Enter the Snapshot Folder network share path that you configured in the previous topic, then select Next.
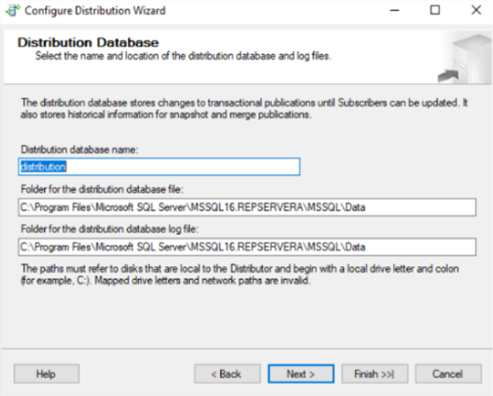
Name the distribution database and the file paths for both the distribution database and the associated log files.
Note
The location of the distribution database and log files should be on a separate drive from the FactoryLogix database files.
Select Finish until the wizard finishes.
Configure database permissions and properties
While still connected to the FactoryLogix database server in SSMS, expand the Security folder, right-click Logins, then select New Login.
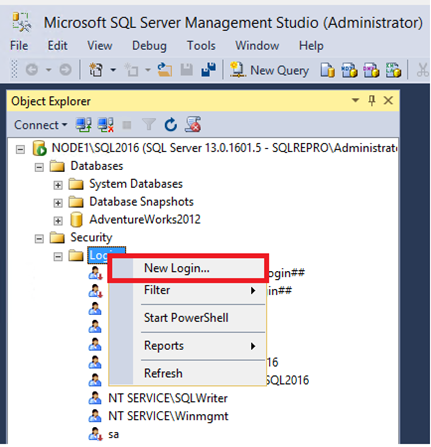
Add the accounts to be used as the agents (the ones you defined earlier here: Configure SQL transactional replication | Create-Windows-accounts-for-replication) as logins on the SQL server.
Each account must be user mapped to both the FactoryLogix database and the distribution database (created earlier) as db_owner membership.
Open the Advanced Properties for the SQL Server.
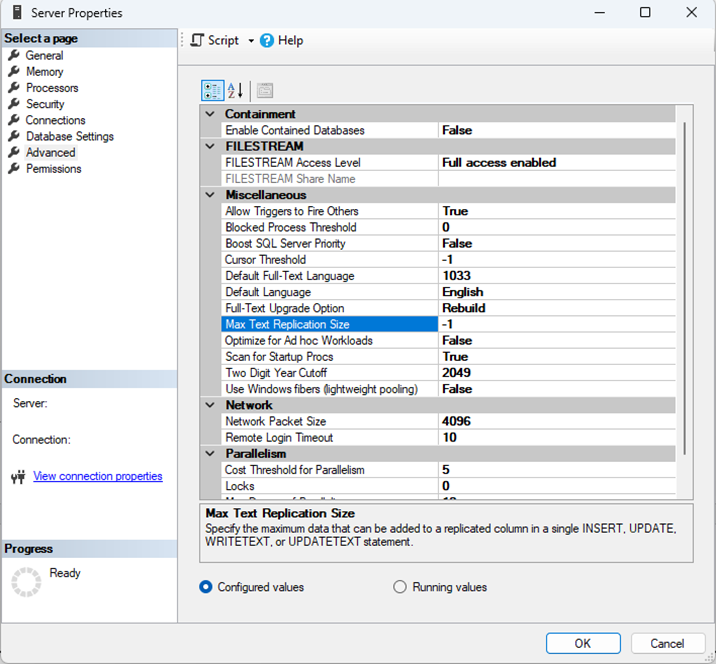
Set Max Text for Replication to -1.
This step allows for unlimited replication size to be transacted in a single transaction from the Publisher to the Subscriber.
Configure replication
The Microsoft Windows Tutorial for configuring replication can be found here: https://learn.microsoft.com/en-us/sql/relational-databases/replication/tutorial-replicating-data-between-continuously-connected-servers?view=sql-server-ver17. Be sure to review this tutorial before following the steps in this procedure.
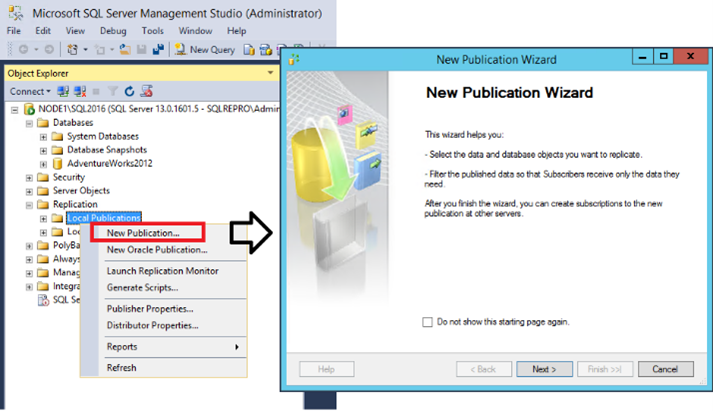
Configure the publisher for transactional replication
While running SQL Server Management Studio (SSMS) as an Administrator, connect to the FactoryLogix database server.
Expand the Replication folder, right-click Local Publication, then select New Publication to open the New Publication Wizard.
Select the FactoryLogix database on the Publication Database page, then select Next.
Select Transactional publication on the Publication Type page, then select Next.

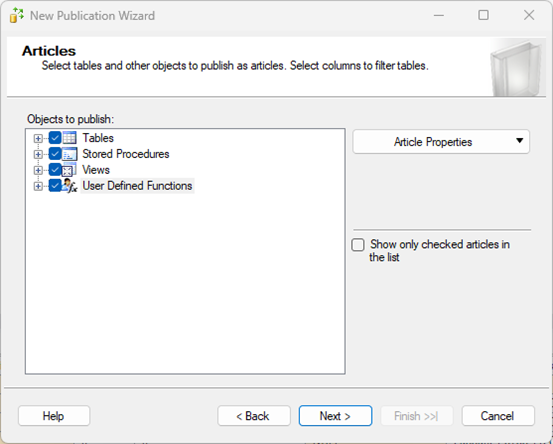
On the Articles page, select all of the check boxes shown, then select Next.
Note
The replicated reporting database will be an exact copy, so every article will be published.
Select Next through the Articles Issues page.
Note
Potential issues are that certain tables are required, but since all articles are being published, this is not an issue.
Select Next through the Filter Table Rows page.
Note
There is no filtering as the entire database is being replicated.
On the Snapshot Agent page, select Create Snapshot Immediately and Keep, then select Next.
This step will generate the snapshot once the wizard is completed and make the initial synchronization available for the subscriber.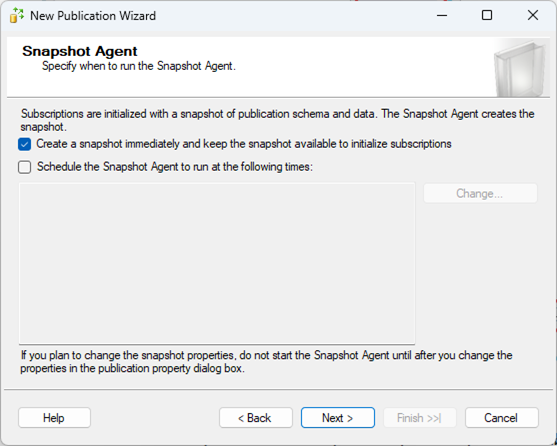
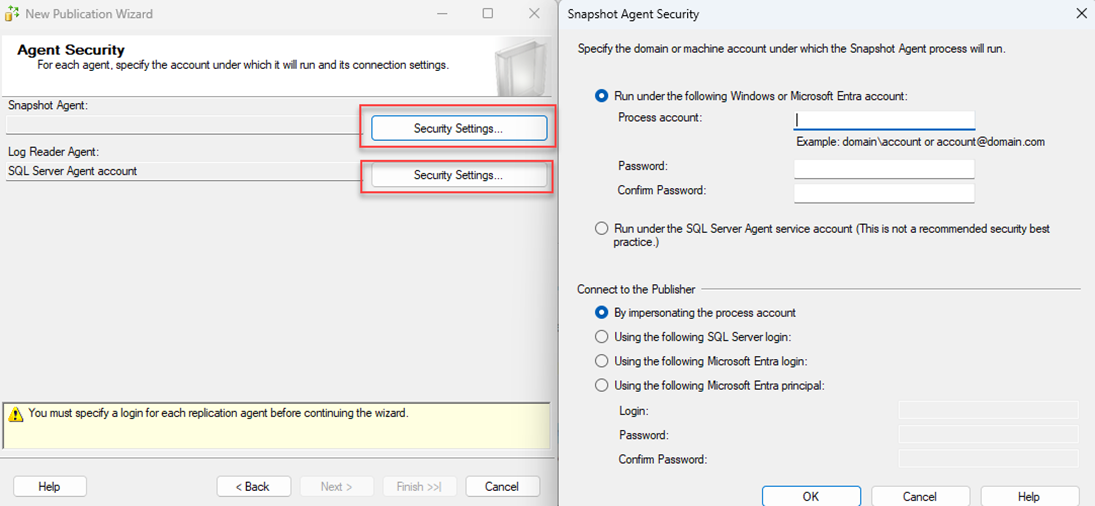
For both the Snapshot and Log Reader Agents, set the user account that the server will use—these should be the Windows accounts that you added or selected earlier here: Configure SQL transactional replication | Create-Windows-accounts-for-replication—then select Next.
Validate that the Create the Publication option is selected on the Wizard Actions page, then select Next.
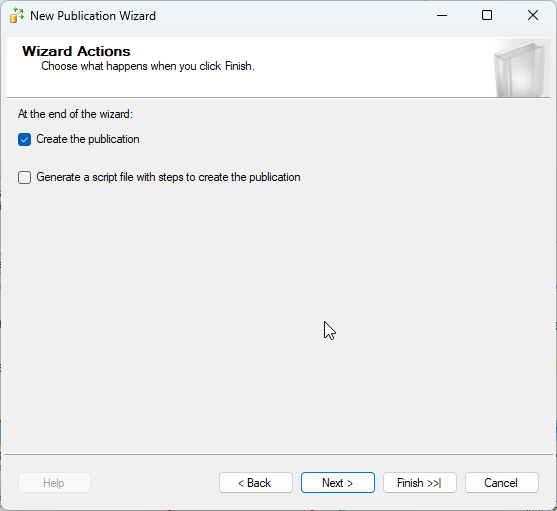
Give the Publication a Name, then select Finish.
The Publication will be generated including the snapshot being taken of the FactoryLogix database.
Validate the status of the snapshot generation
Expand the Local Publications folder in the tree, right-click the publication that was generated, then select View Snapshot Agent Status.
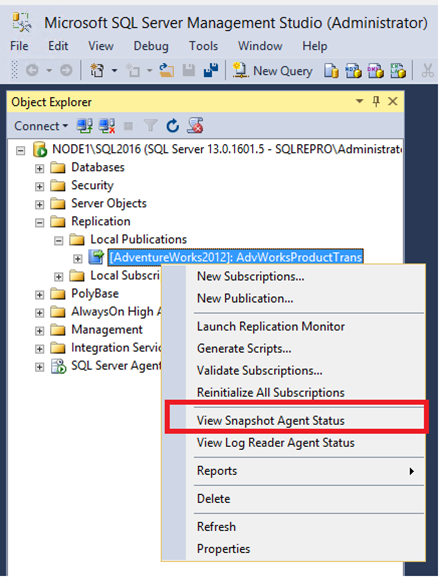
If the status message shows The agent has never been run, select the Start button.
Validate that the status message displays a Green check mark and the snapshot of the articles was generated.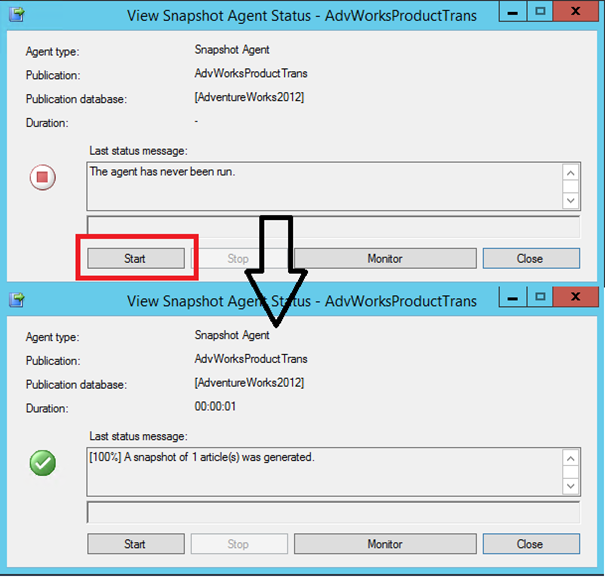
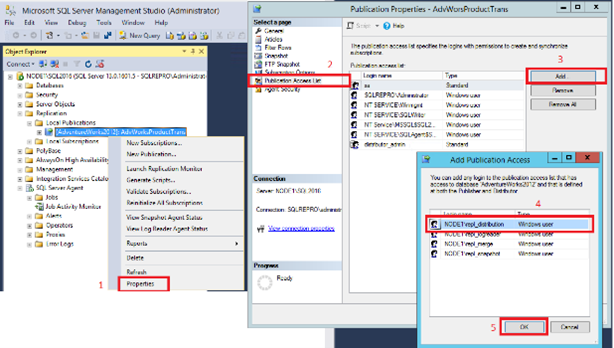
Add the distribution agent to the publication access list
Right-click the publication, select Properties, then select Publication Access List.
Select Add, then add the user chosen or created earlier, then select OK.
Configure the subscription to the publication
Right-click the publication that was created, then select New Subscriptions to open the New Subscription Wizard.

Select the publication that was created on the Publication page, then select Next.
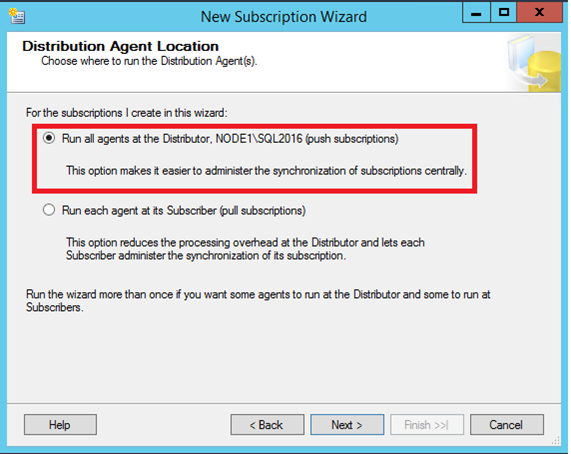
On the Distribution Agent Location page, select Run all agents at the Distributor, then select Next.
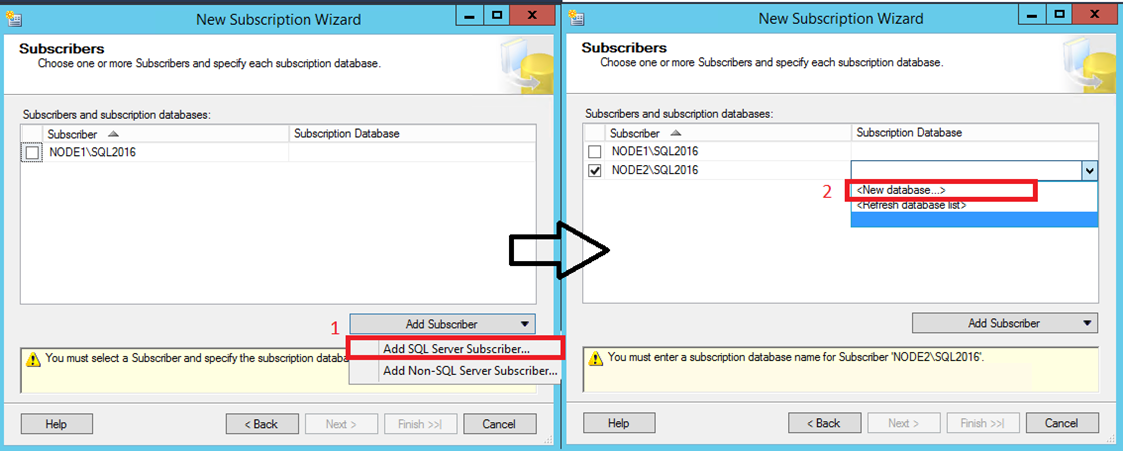
On the Subscribers page, select Add Subscriber, then select Add SQL Server Subscriber to open the Connect to Server dialog.
Once the server has been added, select <New Database…> from the Subscription Database drop-down to open the New Database dialog.
After the database is created, select it from drop-down, then select Next.
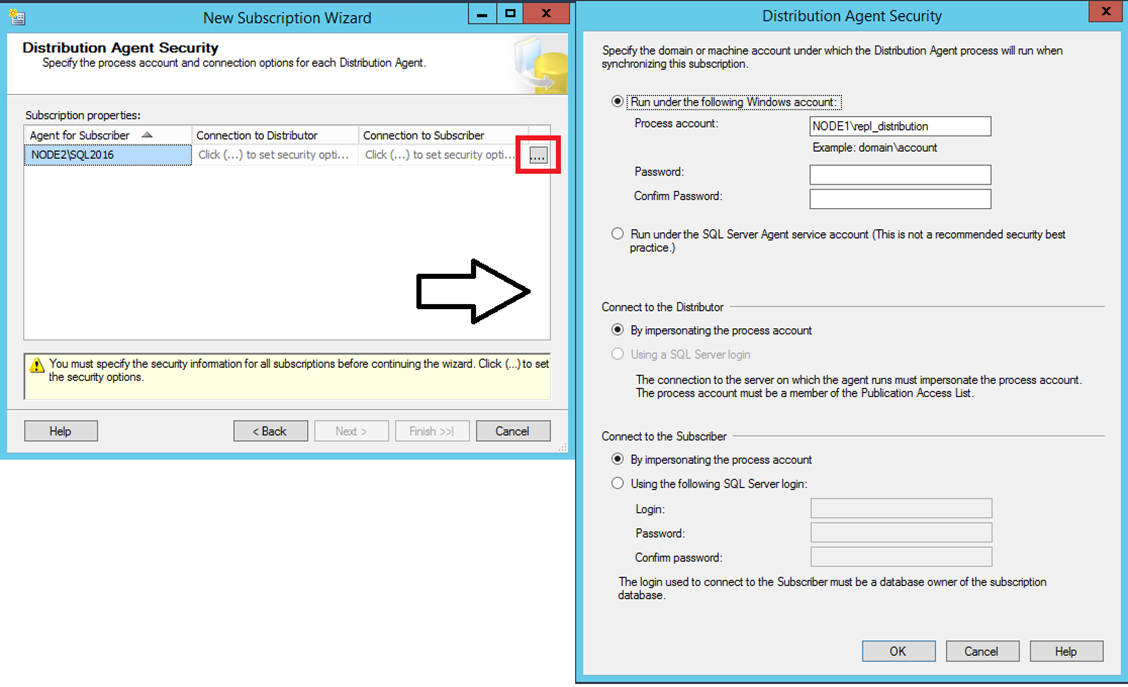
On the Distribution Agent Security page, select the ellipses button (…), enter the credentials for the Distribution Agent (these should be the Windows accounts that you added or selected earlier here: Configure SQL transactional replication | Create-Windows-accounts-for-replication), then select Next.
Select Finish to complete the wizard.
Configure the subscriber database permissions
Connect to the reporting database server in SSMS, expand the Security folder, right-click Logins, then select New Login.

Add the accounts to be used as the agents (that you created earlier here: Configure SQL transactional replication | Create-Windows-accounts-for-replication) as logins on the SQL server.
Each account must be user mapped to both the FactoryLogix Database and the distribution database (the accounts you created earlier) as db_owner membership.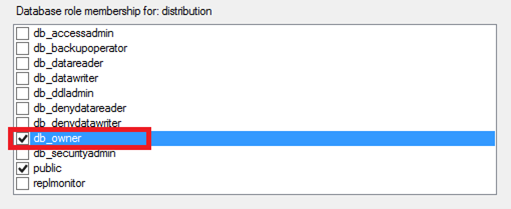
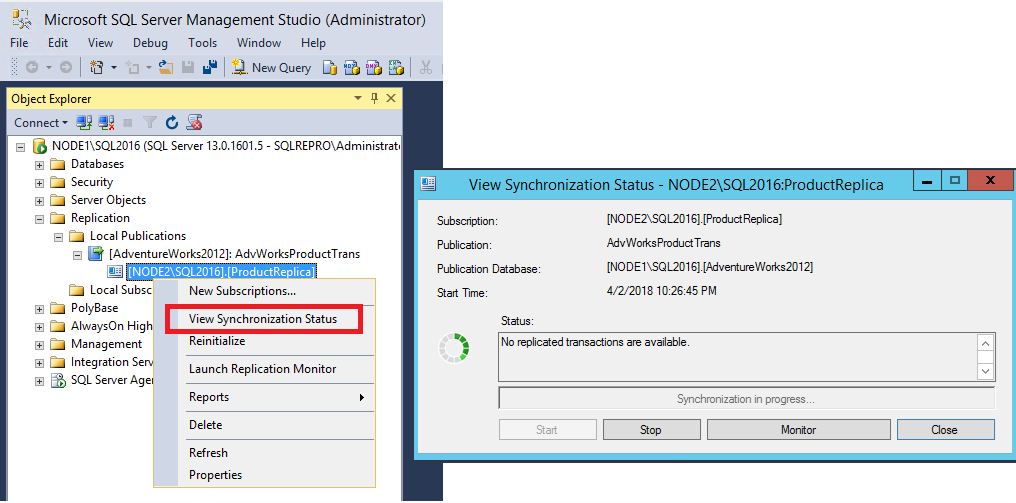
Validate the synchronization status
Expand the Local Publications folder.
Expand the new publication, right-click the subscription that was generated, then select View Synchronization Status.