
Define and manage custom fields
Introduction
A custom field consists of a label and a value you use to further customize, identify, or differentiate part numbers (Manufacturer, Customer, or Internal), BOM line items, processes, defects, customers, and time-based operations. In FactoryLogix Office, you can define and manage custom fields that allow process engineers to enter a specific value and/or text value for each custom field.
You can open the Custom Field window from FactoryLogix Office > System Configuration > Define Custom Fields.

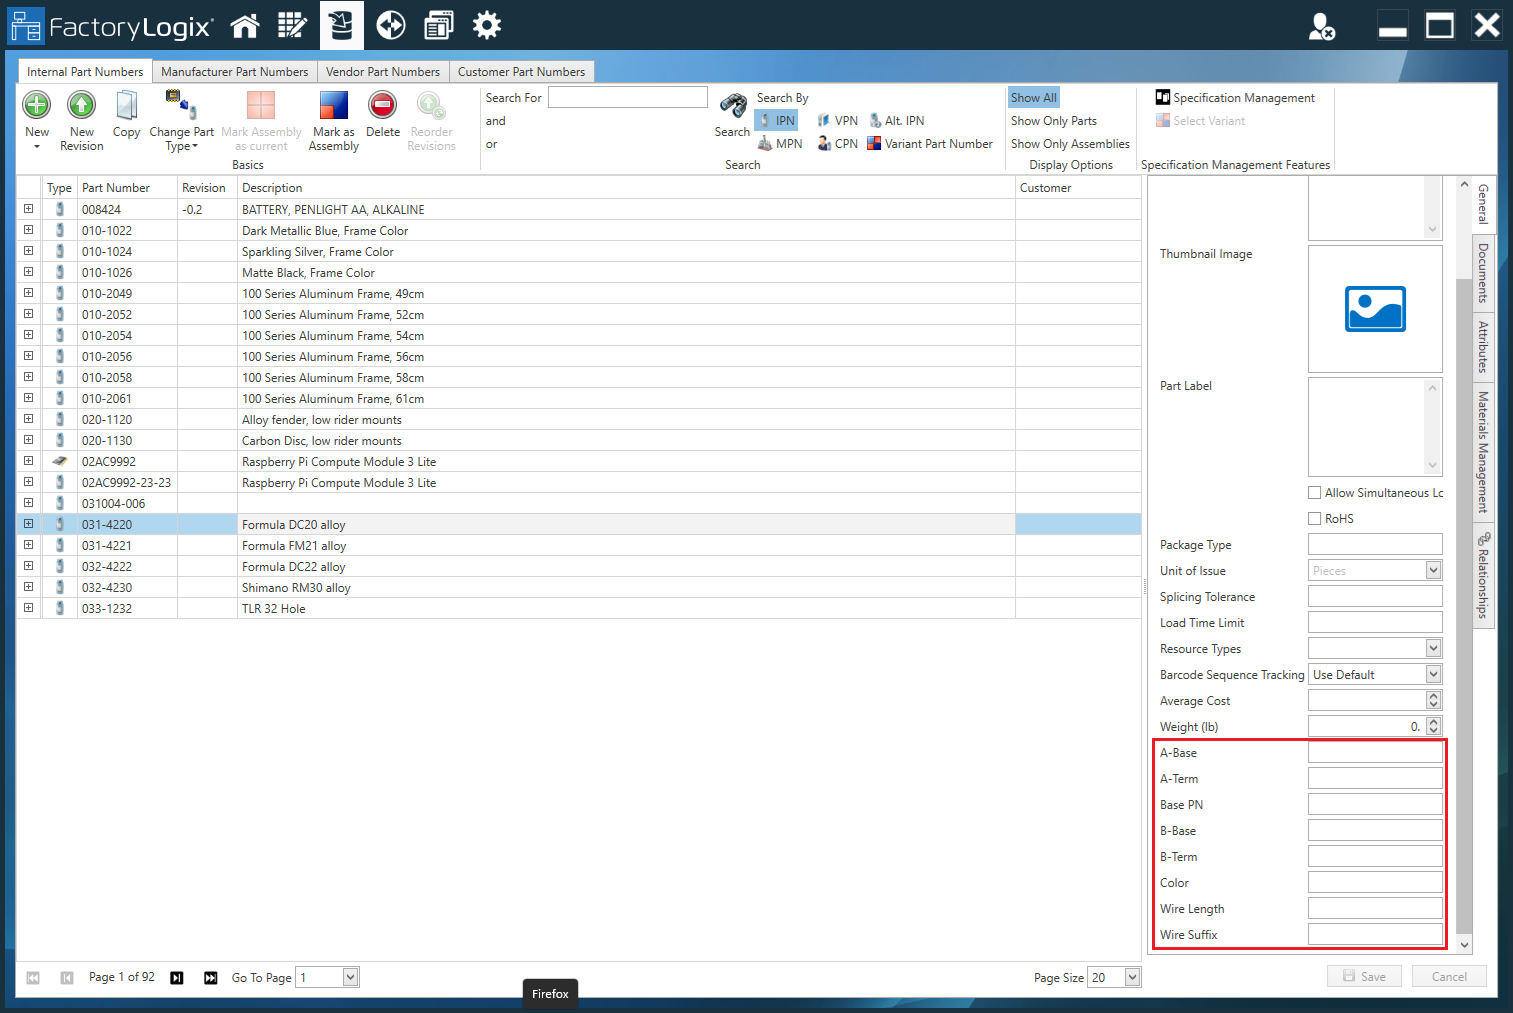
Custom field example
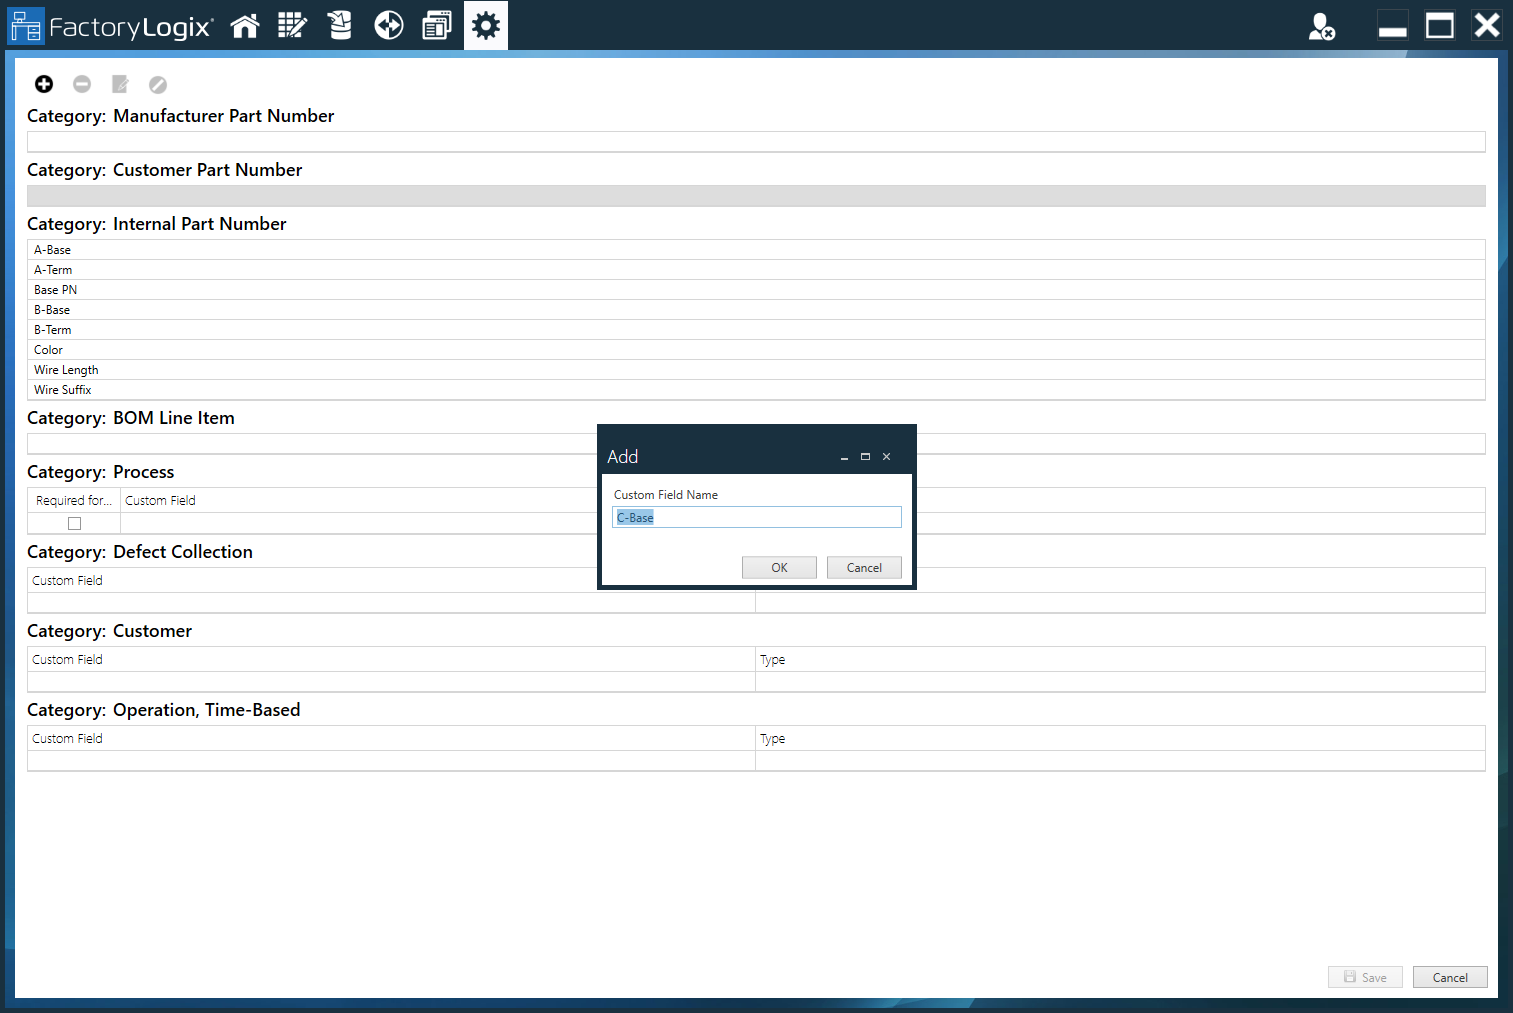
In FactoryLogix, the name you specify for a custom field displays next to the text box where the custom field value will be entered. In the following illustration, the following custom fields are defined and available to use for selected Internal Part Numbers (IPNs): A-Base, A-Term, Base PN, B-Base, B-Term, Wire Length, and Wire Suffix.
Custom field categories
In the Custom Field window, you can define and manage custom fields in these categories:
Custom field category | Where displayed and used |
|---|---|
Manufacturer Part Number | Custom fields display in these areas of FactoryLogix:
Note Custom fields you define for part numbers are also displayed in the Map Column Headers dialog with the assigned field name followed by the part number type in parentheses (MPN), (CPN), and (IPN). When you import a BOM, the custom fields are available to map to selected column headers in the BOM. |
Customer Part Number | Custom fields display in these areas of FactoryLogix:
Note Custom fields you define for part numbers are also displayed in the Map Column Headers dialog with the assigned field name followed by the part number type in parentheses (MPN), (CPN), and (IPN). When you import a BOM, the custom fields are available to map to selected column headers in the BOM. |
Internal Part Number/ Inventory Item |
Note All Internal Part Number custom fields are also Inventory Item custom fields. Custom fields display in these area of FactoryLogix:
When you define an Internal Part Number custom field as a list, the field is presented as a drop-down list. When you define a vendor label, all Internal Part Number custom fields are added to the list of Simple Field values that can be added to the label. Example When an Internal Part Number / Inventory Item list custom field value is defined within a category, all reporting of that custom field value will include both the value and the category as follows: <Value> [<Category>] United States If the value United States is selected the Internal Part Number / Inventory Item custom field value shall be reported in Trace and Analytics as: United States However, if the value China is selected the Internal Part Number / Inventory Item custom field shall be reported in Trace and Analytics as: China [Asia] Note Custom fields you define for part numbers are also displayed in the Map Column Headers dialog with the assigned field name followed by the part number type in parentheses (MPN), (CPN), and (IPN). When you import a BOM, the custom fields are available to map to selected column headers in the BOM. |
BOM Line Item | Custom fields display in the Map Column Headers dialog with the field name followed by (BOM). |
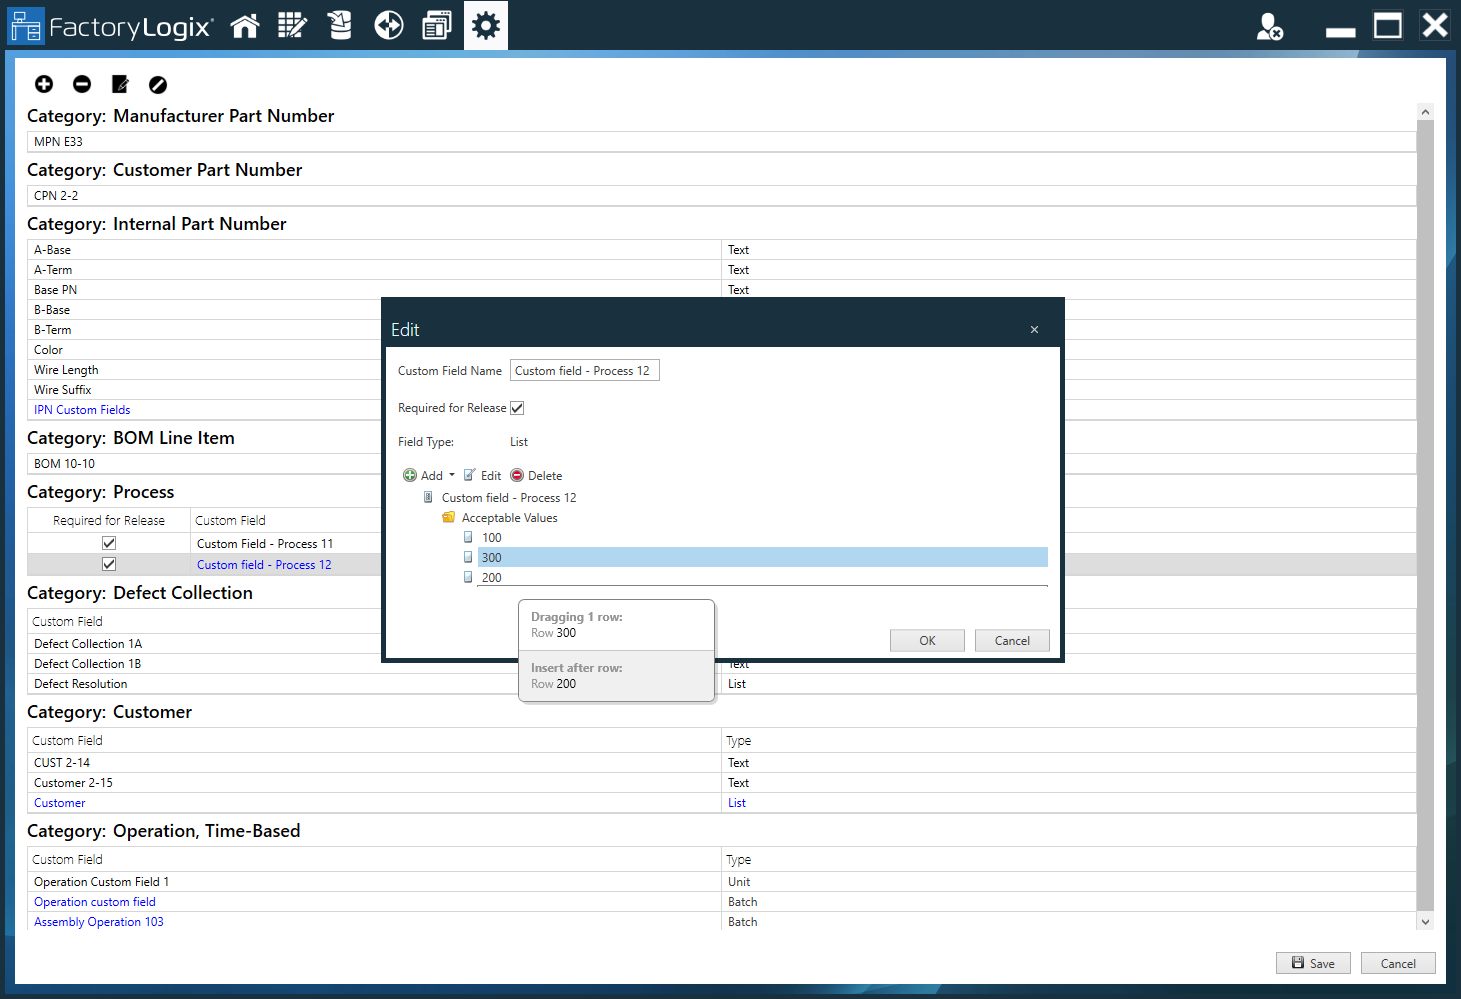
Process | Custom fields display in the Update Process Properties dialog on the Additional Information tab. Note You can select whether a process custom field is required for release when you define it. |
Defect Collection | Custom fields display in the Add Defect dialog in FactoryLogix Operations. |
Customer | Custom fields display on the Custom Field tab in the Customer Library. |
Operation, Time-Based | Custom fields display in the New Operation/Update Operation dialog under Advanced Options. Time-based custom fields for an operation are added to the list of smart text available when authoring a visual aid. |
Custom fields using lists and categories
You can define custom fields for to use either a text value or a list of values that you can arrange in categories for these custom field types:
IPN
Process
Defect Collection
Customer
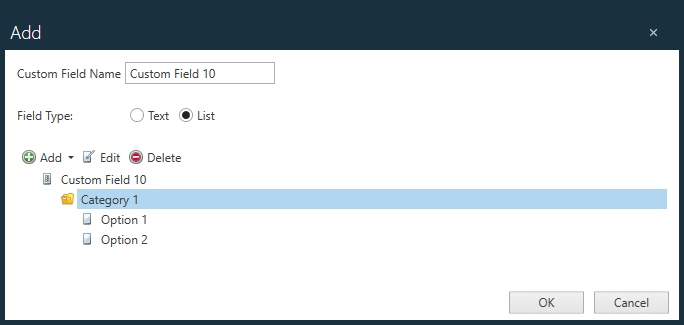
If the custom field is defined to use a list, the list string values may be grouped into categories. Every entry (category or value) within the list for a custom field must be unique within that list.
When an operator is recording a value for a custom field, the list of valid values from which one can be picked is displayed with the entries listed in the same order as defined in the custom field definition. When defining the list for a custom field, you can reorder list entries as desired by dragging and dropping items into the desired order.
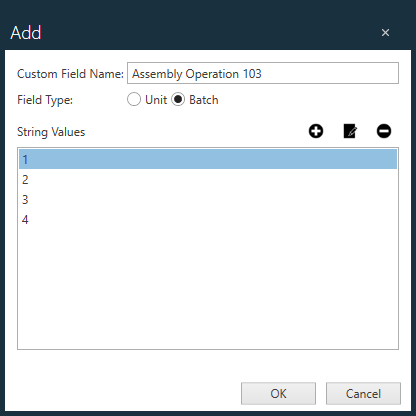
Operation, Time-Based custom field values
When you add a new custom field in the Operation, Time-based catory of the Custom Field window, these options allow you to specify a field type of Unit or Batch and add string values for the operation. Each of these operation custom fields can record a simple text value or a value selected from a customer-defined list of string values.
Custom field values used in reporting
Custom fields that utilize list values are used in FactoryLogix reporting in the following areas of the system:
FactoryLogix Office
Part properties in the Part Library
Inventory search results in the Inventory Management feature
Within a vendor label during the receiving of material
Within a printed label when that label is a material, product, or packout label
BOM Import
FactoryLogix Operations
Inventory search results in the Inventory Management feature
Within a Vendor Label during the receiving of material
Within a printed label when that label is a material, product, or packout label
Materials Management
Inventory search results in the Inventory Management feature
Within a vendor label during the receiving of material
Within a printed label when that label is a material, product, or packout label
Analytics
Inventory data source results in DataMiner
Installed component data source results in DataMiner
Define a custom field
Log into FactoryLogix Office.
Select System Configuration > Define Custom Fields to display the Custom Field window.
Select the blank area under one of the custom field categories (Manufacturer Part Number, Customer Part Number, Internal Part Number, BOM Line Item, Process, Defect Collection, Customer, or Operation, Time-Based).
Select the Add New Custom Field to Selected Category
 button.
In the dialog, enter the name for the custom field under Custom Field Name. (If you selected the Process category in Step 3, select the Required for Release check box if the custom field will be required to release the process to production).
(Optional) If you select a custom field in the IPN, Process, Defect Collection, or Customer category, select Text or List for the custom field, then do one of the following:
Select Text, then select OK.
Select List, create a simple list or a list with categories if desired, then select OK.
If you selected Operation, Time-Based, select Units ot Batch for the Field Type, add the desired String Values, then select OK.
To delete a custom field, select the field, select the Delete Selected Custom Field
 button, then select Yes in the confirmation dialog.
To change the name of a custom field, select it, select the Edit Selected Custom Field
 button, modify the field name, then select OK.
To temporarily disable the use of any custom field in FactoryLogix, select the field, then select the Disable Selected Custom Field
 button. (The field will remain disabled (dimmed) and unavailable to use until you select it and then select the Disable Selected Custom Field button again.)