
Create an inventory audit plan
Creating an inventory audit plan involves specifying various properties and filters to determine the pool of inventory to be counted before adding the specific plan details.
In FactoryLogix Materials Management, an audit plan definition ultimately defines the total inventory pool to be counted. An inventory pool represents your organization’s overall stock including all factory locations, product lines, and channels, and also provides a single view of inventory available for use or sale.
Important
The audit plan properties you see depend on the audit plan type you select when you create a new audit plan. As you go through this procedure, take note of the different plan type properties associated with the three available plan types: Continuous, Random Sample, and Inventory By Exception.
Log into the FactoryLogix website.
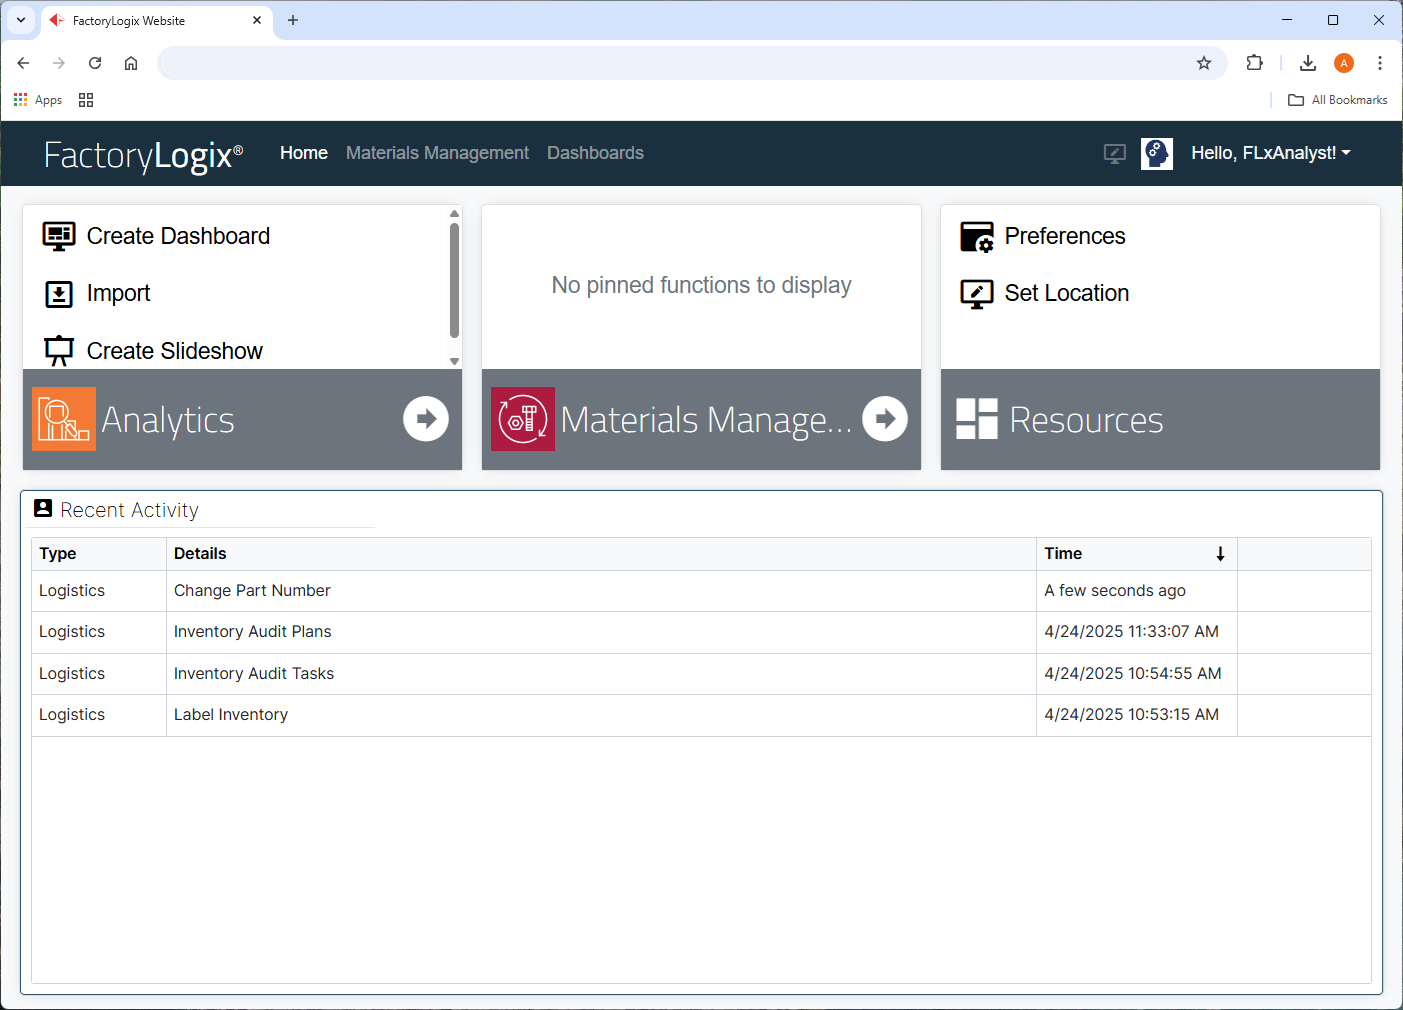
Select Materials Management.
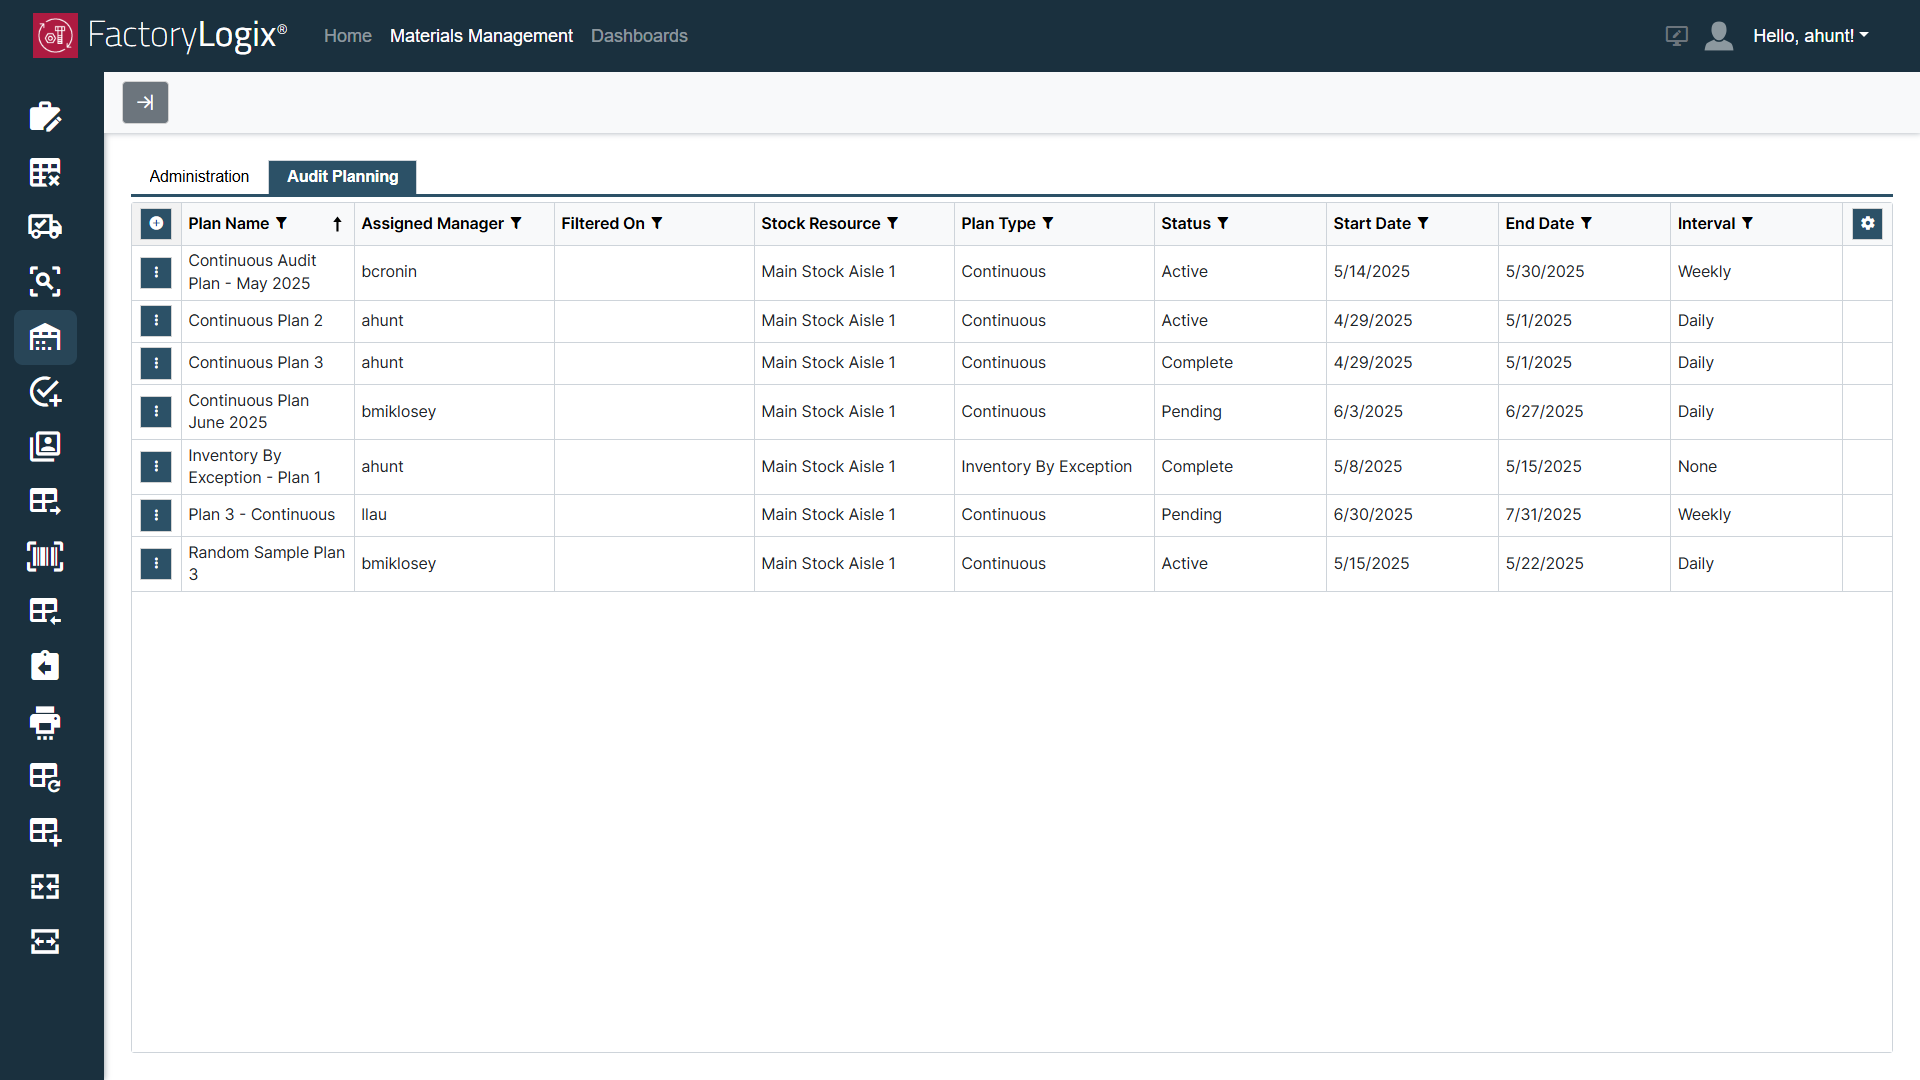
Select Inventory Audit Plans on the left side of the window.
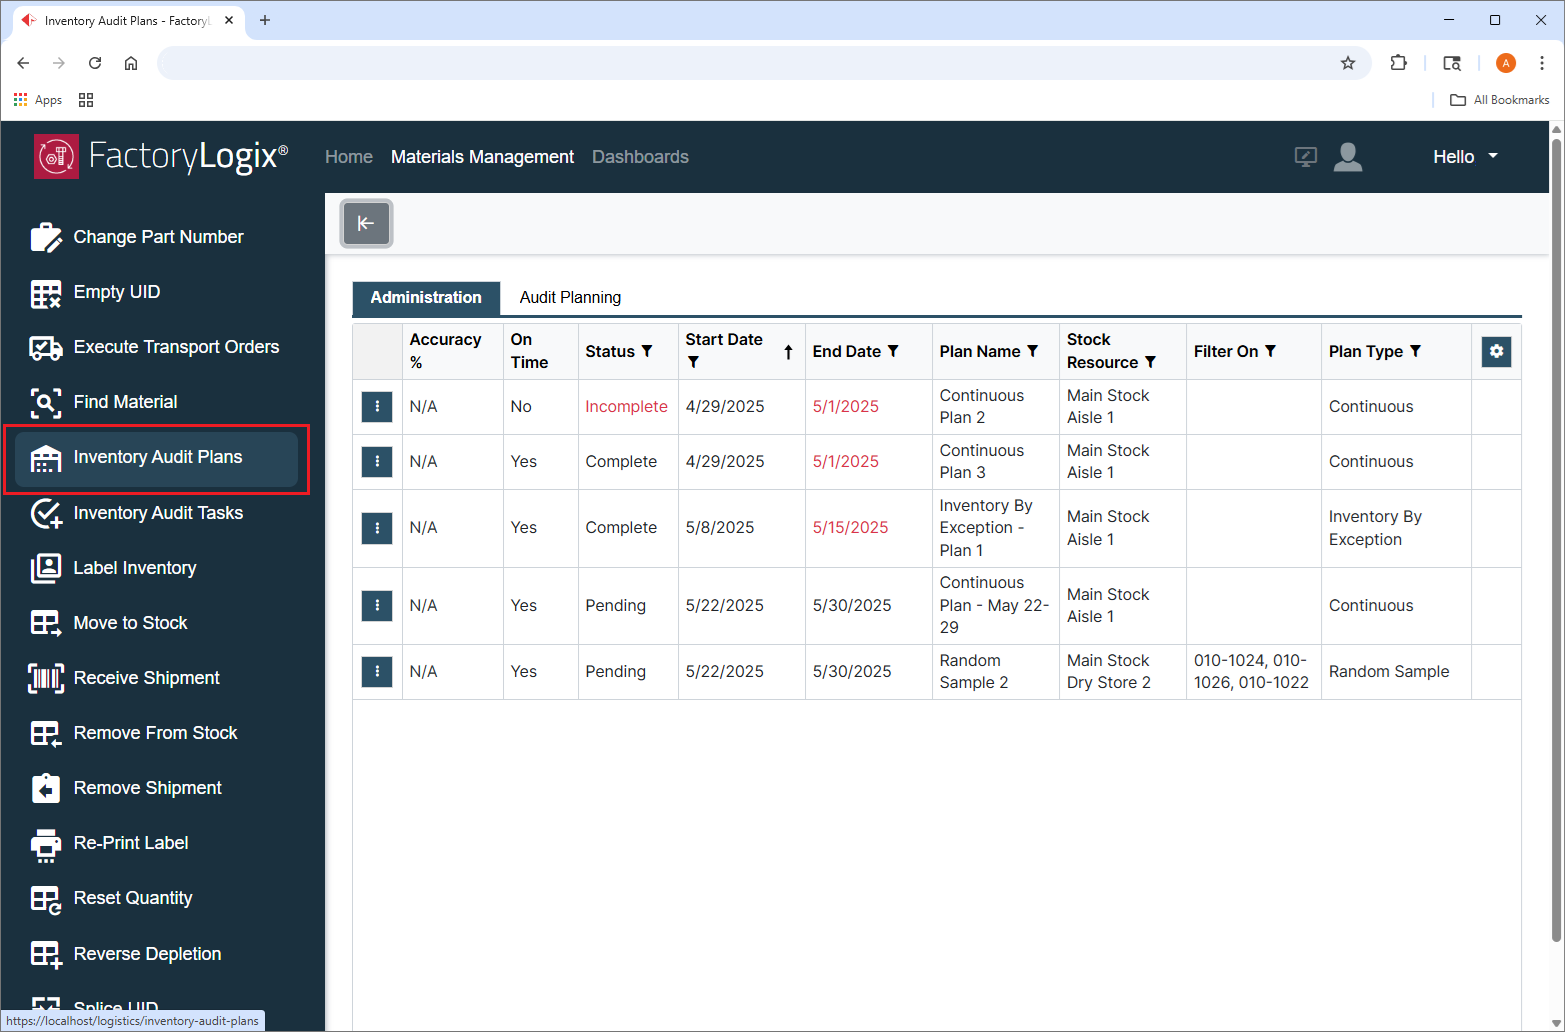
Select the Audit Planning tab.
In the upper-left corner of the grid, select the Add
 button to display the Audit Plan window.
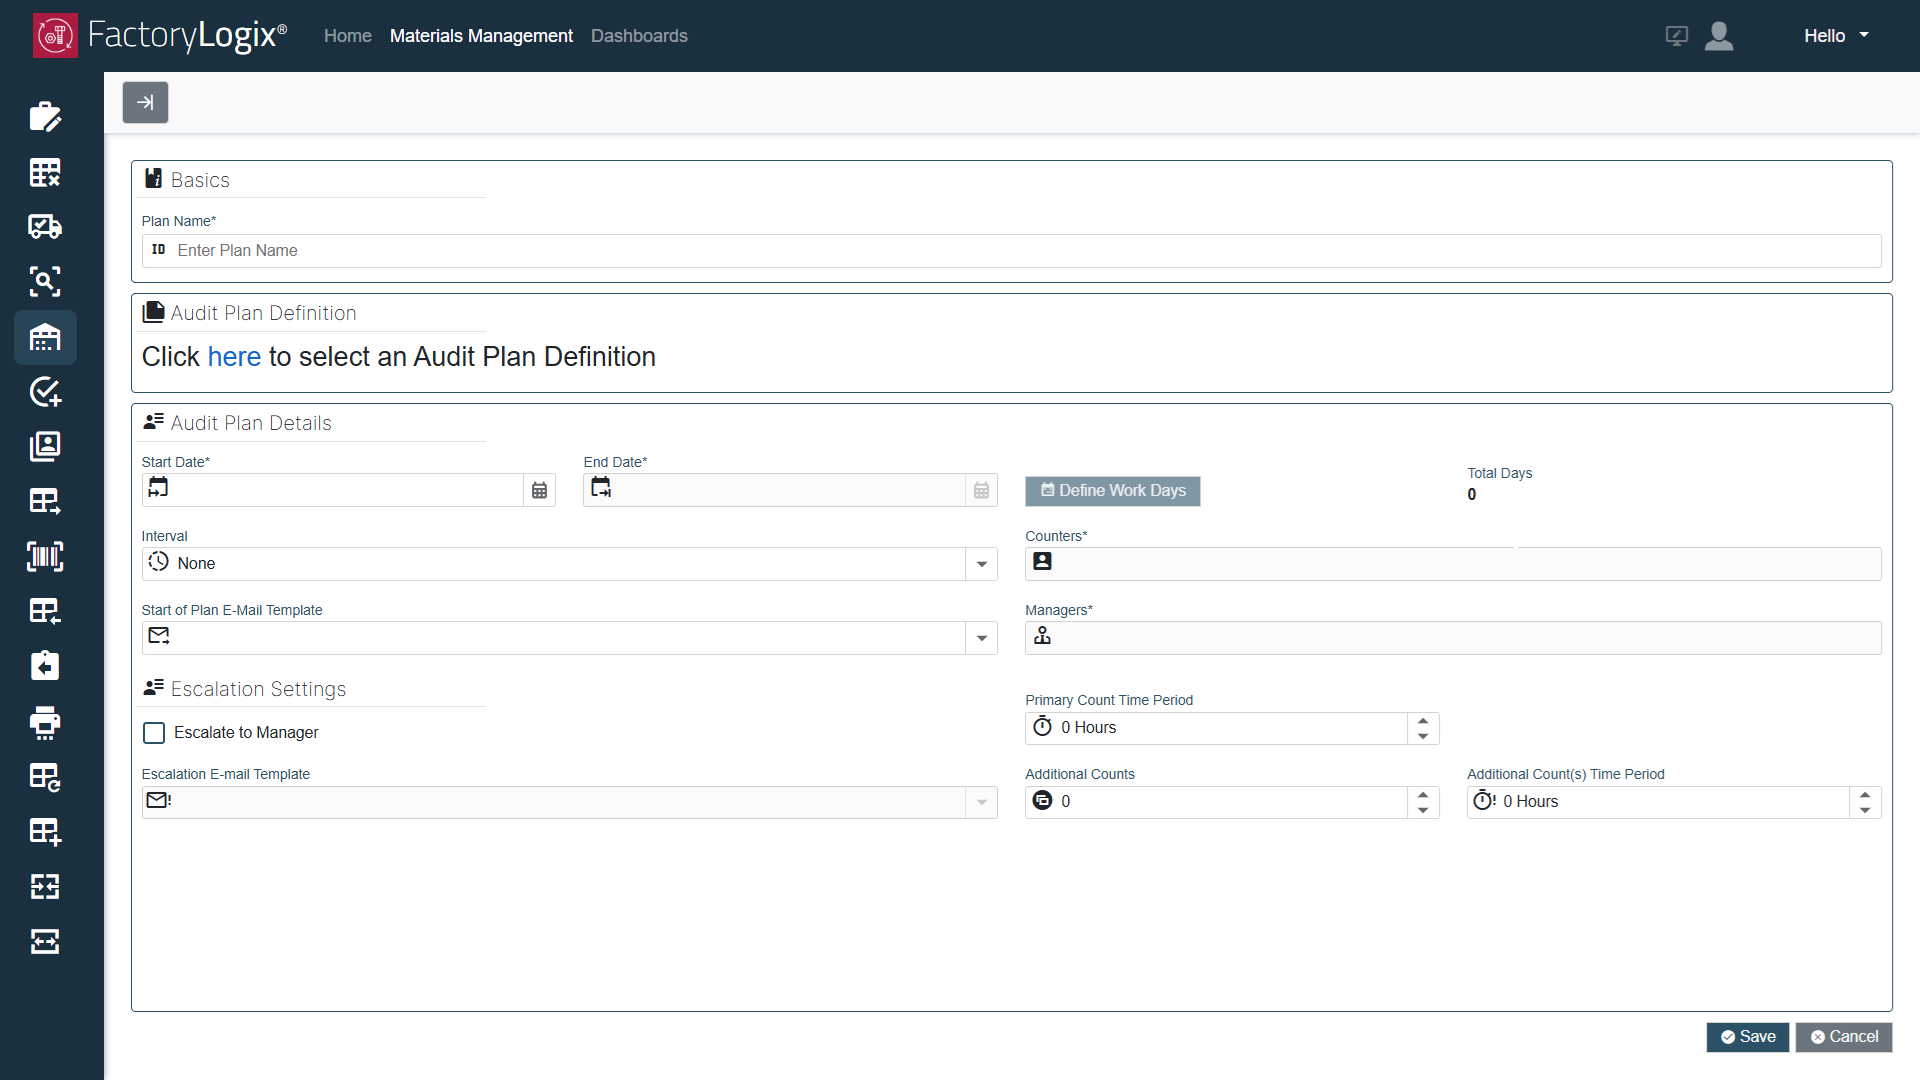
Under Basics, enter the Plan Name for this audit plan.
Note
Audit plan names must be unique.
Tip
If your organization doesn’t already have an audit plan naming/numbering convention, it’s a good idea to be as descriptive as possible with the plan name to help distinguish it from other audit plans. Sometimes adding a numbering convention to an audit plan name can also be useful.
Under Audit Plan Definition, select the “here” link to display the Choose Audit Plan Definition dialog.
Creating an audit plan definition ultimately defines the total inventory pool to be counted. An inventory pool represents your organization’s overall stock including all factory locations, product lines, and channels, and also provides a single view of inventory available for use or sale.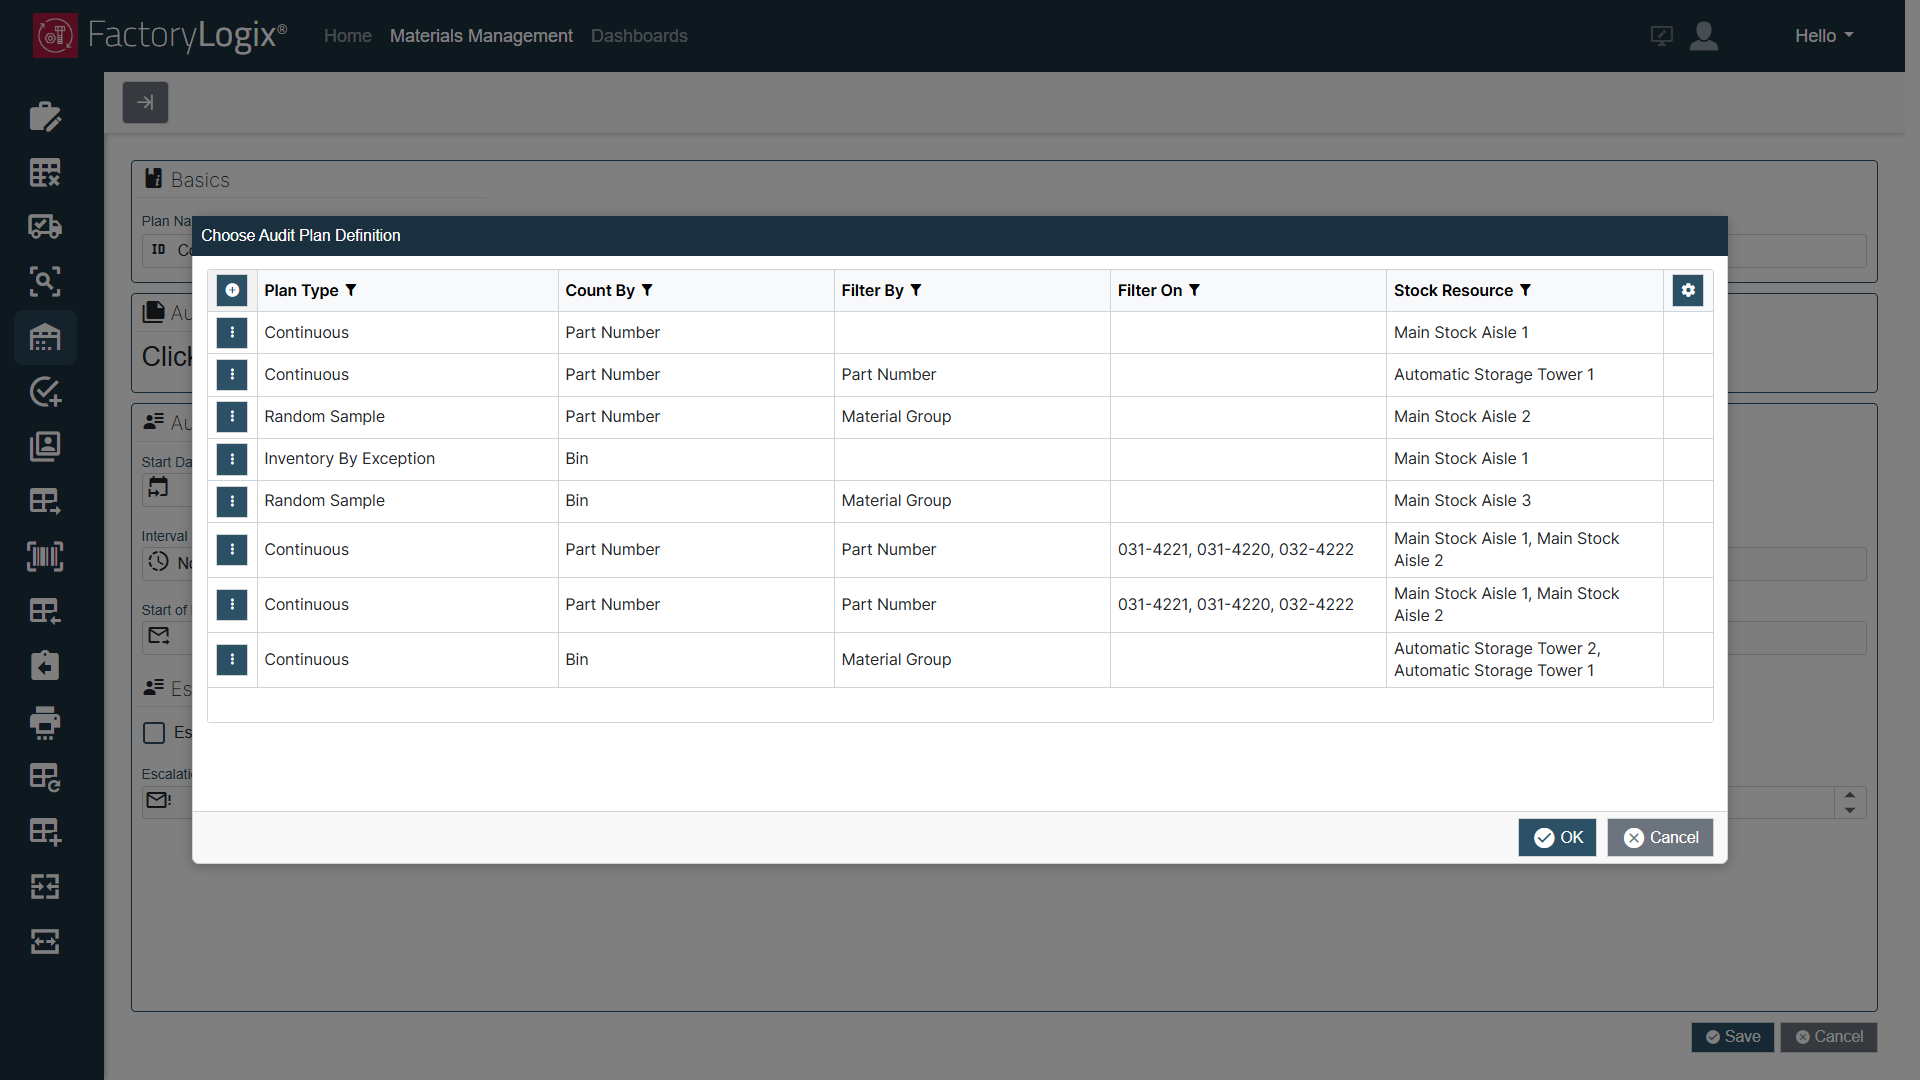
Note
In the Choose Audit Plan Definition dialog, you can create a brand new audit plan by selecting the Add ![]() button or duplicate an existing plan by selecting the three vertical dots
button or duplicate an existing plan by selecting the three vertical dots ![]() button and selecting Duplicate (to quickly duplicate an existing plan that you can then modify) as shown in the following illustration.
button and selecting Duplicate (to quickly duplicate an existing plan that you can then modify) as shown in the following illustration.
For this procedure, we’re focusing on creating a new audit plan definition. To edit an existing plan definition, select the three vertical dots to the left of an existing plan in the grid, then select Edit, Duplicate, or Delete to modify, duplicate, or delete a selected existing audit plan.
Important
The Definition Properties tab contains all the selections you need to create a new audit plan. The properties will differ depending on the plan type you select (Continuous, Random Sample, or Inventory By Exception).
Select the Add
button in the upper-left corner of the grid to display the Create Audit Plan Definition dialog.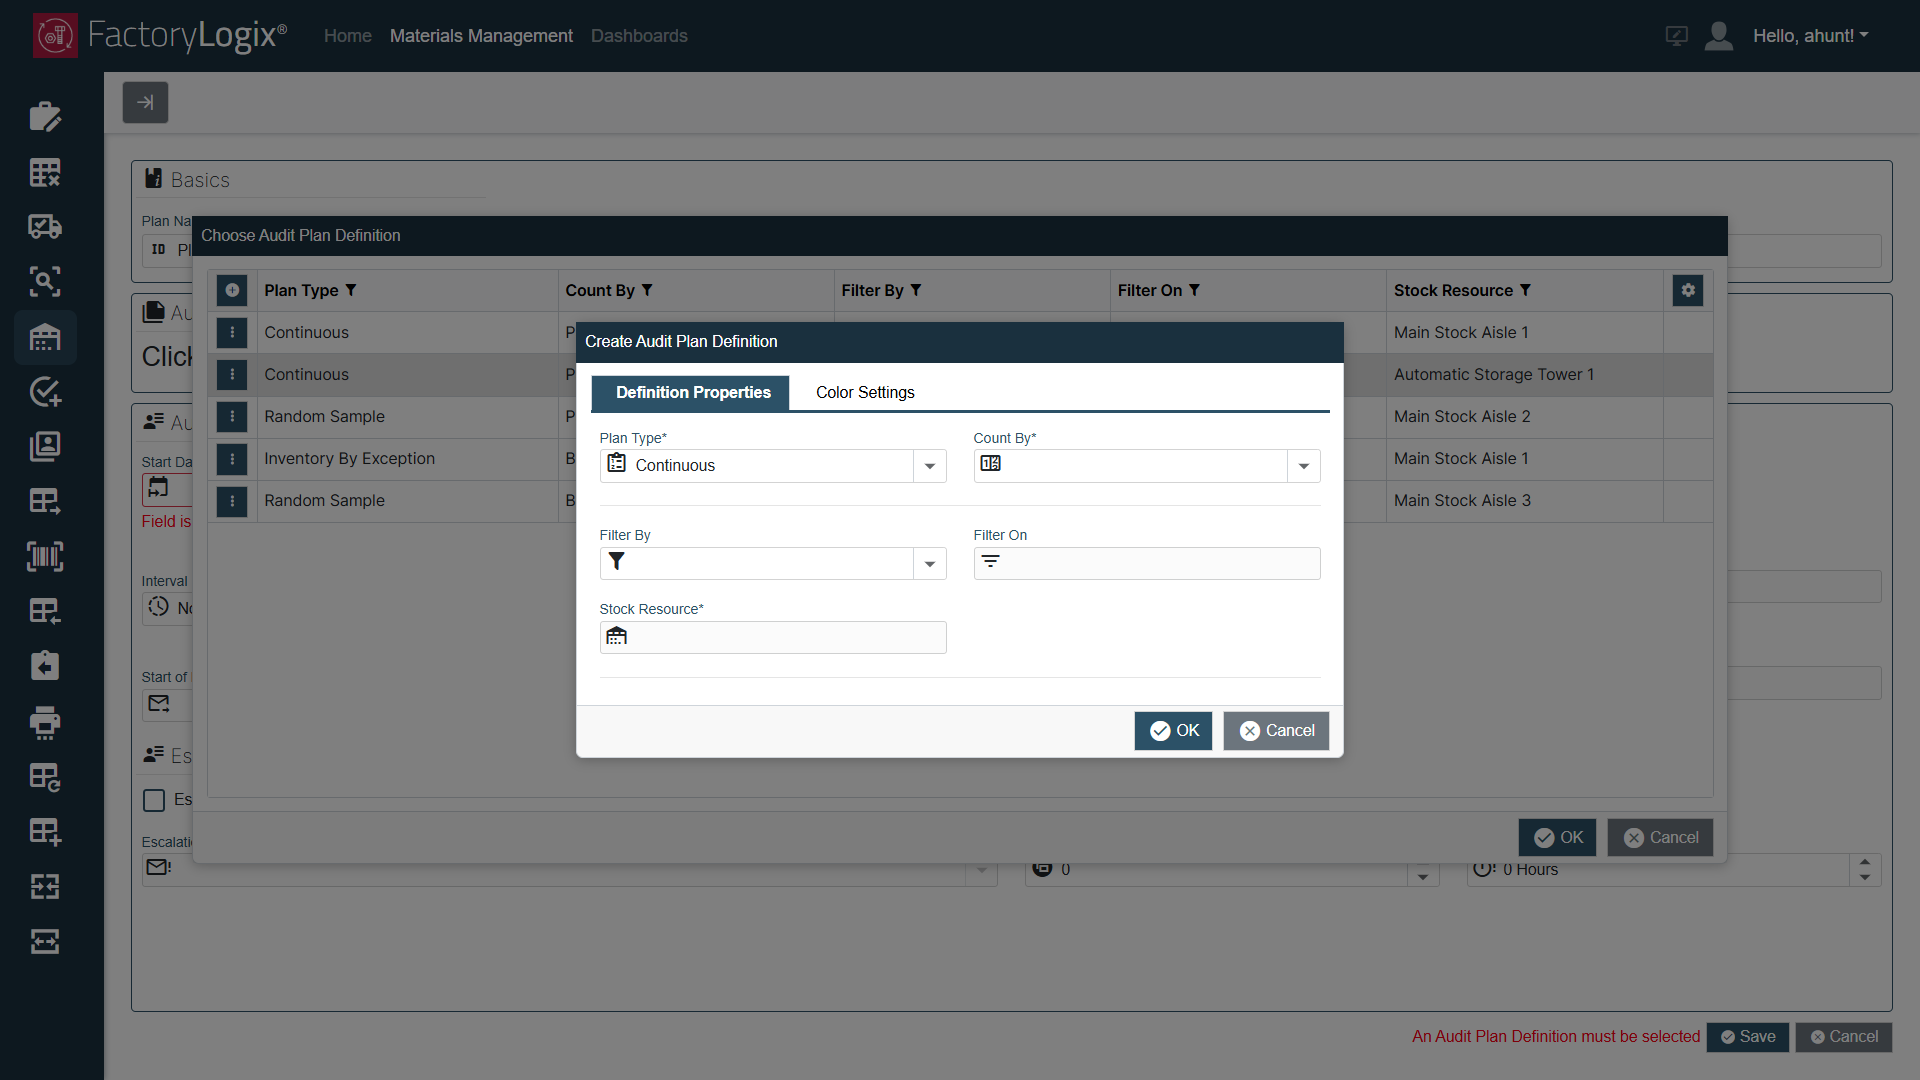
Under Plan Type, select an audit plan type: Continuous, Inventory By Exception, or Random Sample.
Continuous – This plan type is essentially a wall to wall count of the defined inventory done at predetermined intervals. For example, a counter is to count inventory in stock room A from Jan 1st to July 1st at a monthly interval (the whole inventory divided into six parts).Random Sample – This plan type randomly selects a planned percentage of the total inventory to be counted for a planned duration at predetermined intervals.
Inventory by Exception – This plan type involves counting inventory items involved in any type of movement or verification process. For example, an operator needs to remove a particular inventory item from Bin A from stock (Remove From Stock command). He or she then counts the contents of the bin on removal of that inventory item at that time.
Depending on your plan type selection, you’ll see different options on the Definition Properties tab> Here’s a summary of the available options based on the plan type you select:
Definition Property | Applies to Plan Type(s) | Notes |
|---|---|---|
Count By | All |
|
Filter By | All | You can filter by Material Group, Owner, Part Number, or WBS number. A Work Breakdown Structure (WBS) identifies important details behind each activity in the manufacturing process. Project managers can use WBS information to eliminate unknowns and identify variables that could impact manufacturing progress. Please note that WBS information can only be added to FactoryLogix by using an xTend integration. |
Filter On | All | (Dependent on the Filter By field.) Filter On allows a comma delimited list of values based on what's selected for the Filter By field. Selecting the Search button displays a pop-up allowing you to search on the element selected in the Filter By field. You can select multiple values for the Filter On field. |
Stock Resource | All | The stock resource selected for the audit plan. Available stock resources are defined in Materials Management (see Set up stock locations for more information). |
Fix Count at Start Date | Random Sample | The system records the state of inventory at the start of the audit plan which contributes to a comparison of the scanned and result data with the inventory snapshot. This ensures that the counter only counts the inventory that existed at this start date and is compared to the total number of inventory items at that start date. This eliminates the situation of a large number of inventory items being added to stock at the end of the plan duration, causing the counter to have to count a much larger number of remaining stock items in a short time. The default setting is False (unchecked). |
Prioritize Bins Not Audited | Random Sample | With random sampling, unless the system uses the last audit date to compare when selecting random items to count, the selection picked randomly could include items which were already counted during the span of the audit plan. When you select this check box, the system ensures that the last audit date is prioritized when being compared to the audit plan start date. The default setting is False (unchecked). |
Sample Size Percentage | Random Sample | This field is mandatory when creating a Random Sampling audit plan. Select a percentage of the inventory to count for a duration of time at a specific interval. The default percentage value is 100%. |
Counting Trigger | Inventory By Exception | The counting trigger that represents which actions on your inventory will starts the counting on that bin or UID for the audit plan: Move to Stock, Remove From Stock, or both (Select All). |
Counting Threshold | Inventory By Exception | A number representing the threshold value to limit the number of inventory items to be counted. Example: If the threshold value is set to 100 and the bin contains 101 inventory items, a counting task will not be generated for this bin for the material movement(s) defined. |
Re-Count Grace Period | Inventory By Exception | Can be Time Based (x Hours, Days, or Weeks) or Frequency Based (number). A duration specified as to when not to recount the bin or part number initiated by a material movement. |
Allow to Defer | Inventory By Exception | If this setting is checked (True), the deferred time period will overwrite the Field Name Primary Count Period. |
Under Filter By, select the type of filtering you want to use for this audit plan: Material Group, Owner, Part Number, or WBS Number.
Select Stock Resource, then select one or more stock resources (that is, where to count inventory) to be used for this audit plan.
Use the right and left arrow buttons in the middle of the dialog to select or deselect stock resources for the plan, then select OK to confirm your selections and return to the Create Audit Plan Definition dialog.
The Stock Resource specifies where to count the inventory for this audit plan. Select the Search button to display a pop-up allowing you to search for stock resources. (You can select multiple stock resources for an audit plan.)Under Count By, select the type of count to be used for this audit plan: Bin or Part Number.
o If you select Bin, the audit plan will identify all bins which contain the inventory required for the audit.
o If you select Part Number, the plan will identify all part numbers required for the audit.Select Filter On to display the Filter On dialog.
The Filter On field depends on the Filter By field in the Create Audit Plan Definition dialog. Selecting Search (the magnifying glass) displays a pop-up so you can search for the element selected in the Filter By field.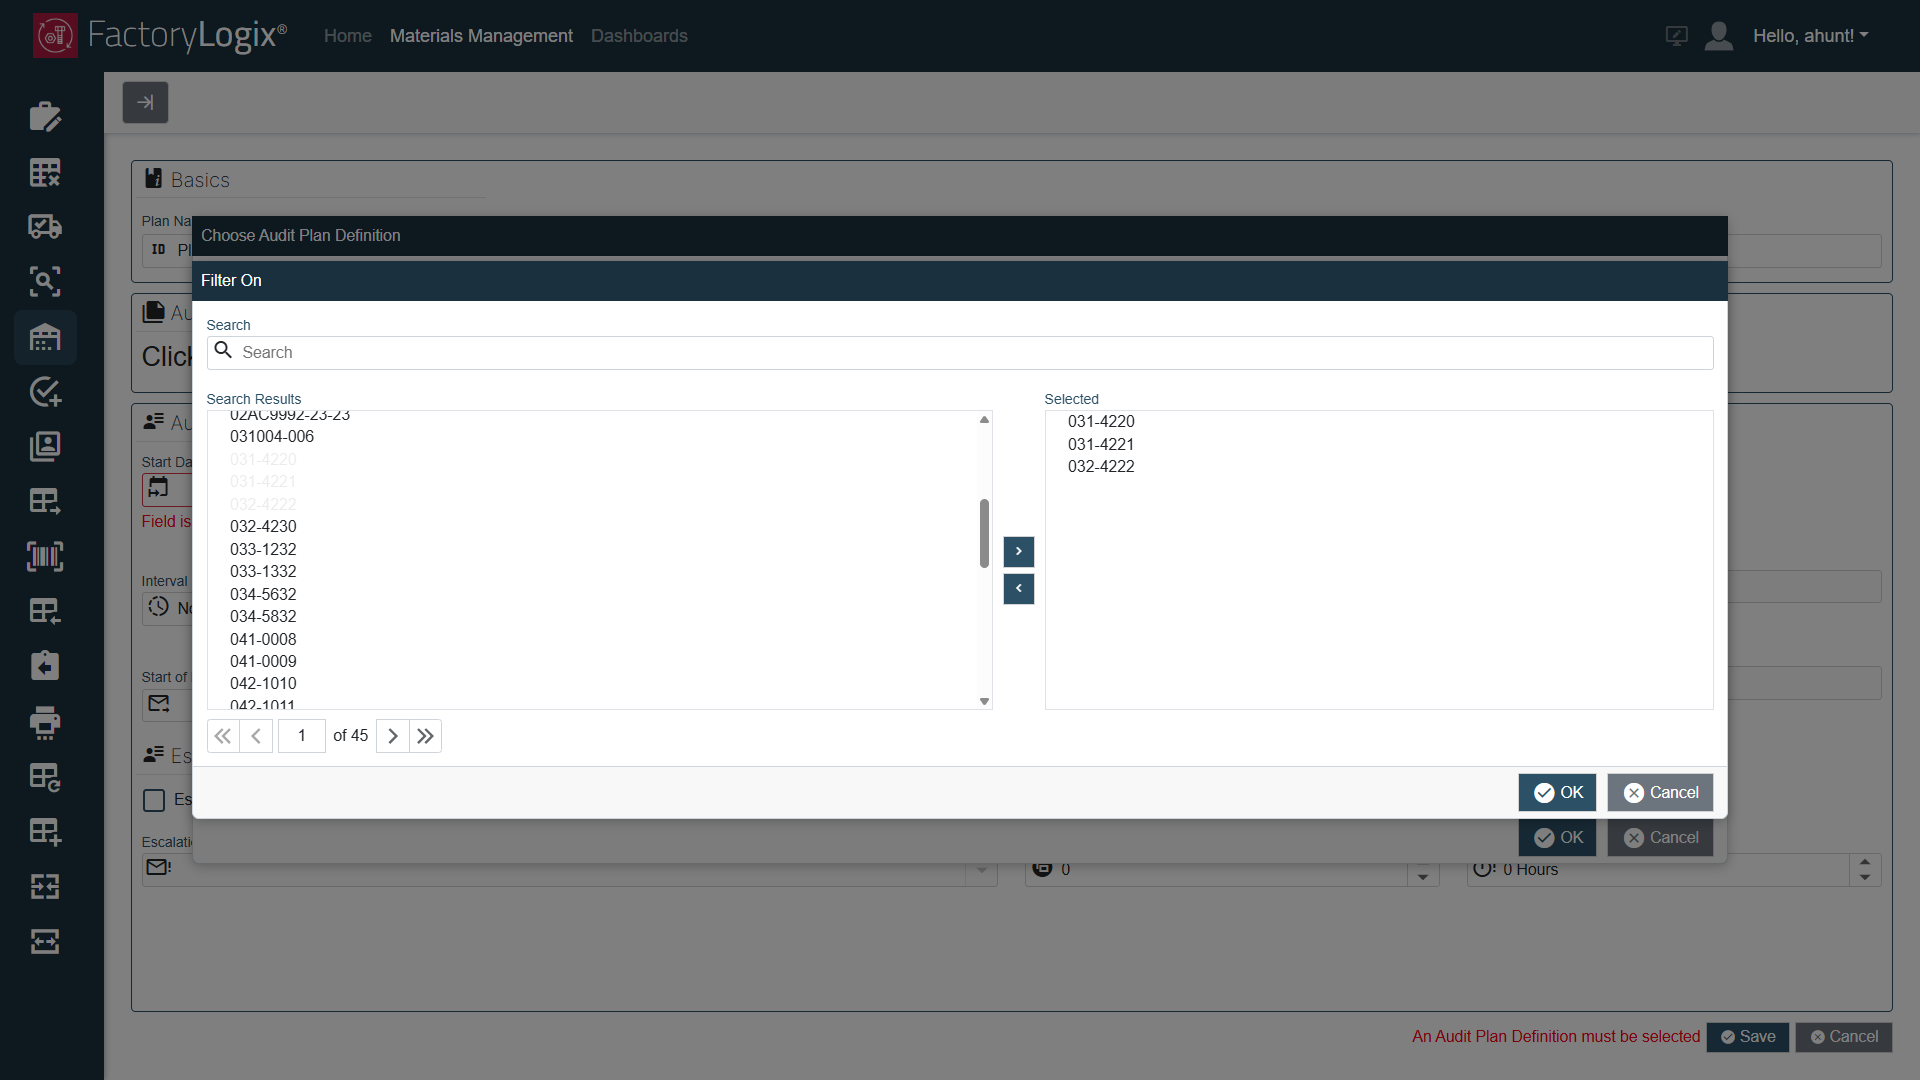
Use the right and left arrow
buttons in the middle of the dialog to select and deselect one or more part numbers or bin numbers (depending on your selection in Step 10) to filter on for the plan, then select OK to confirm your selections and return to the Create Audit Plan Definition dialog.
In the Create Audit Plan Definition dialog, you can now view all your selections for the audit plan.
Select the Color Settings tab.
Under Accuracy Color Settings, select the Add
button.
These settings allow you to choose a different color for highlighting accuracy and schedule issues in the Administration tab views of inventory audit planning.
Note
The default color for each new row to be added is set to Red.
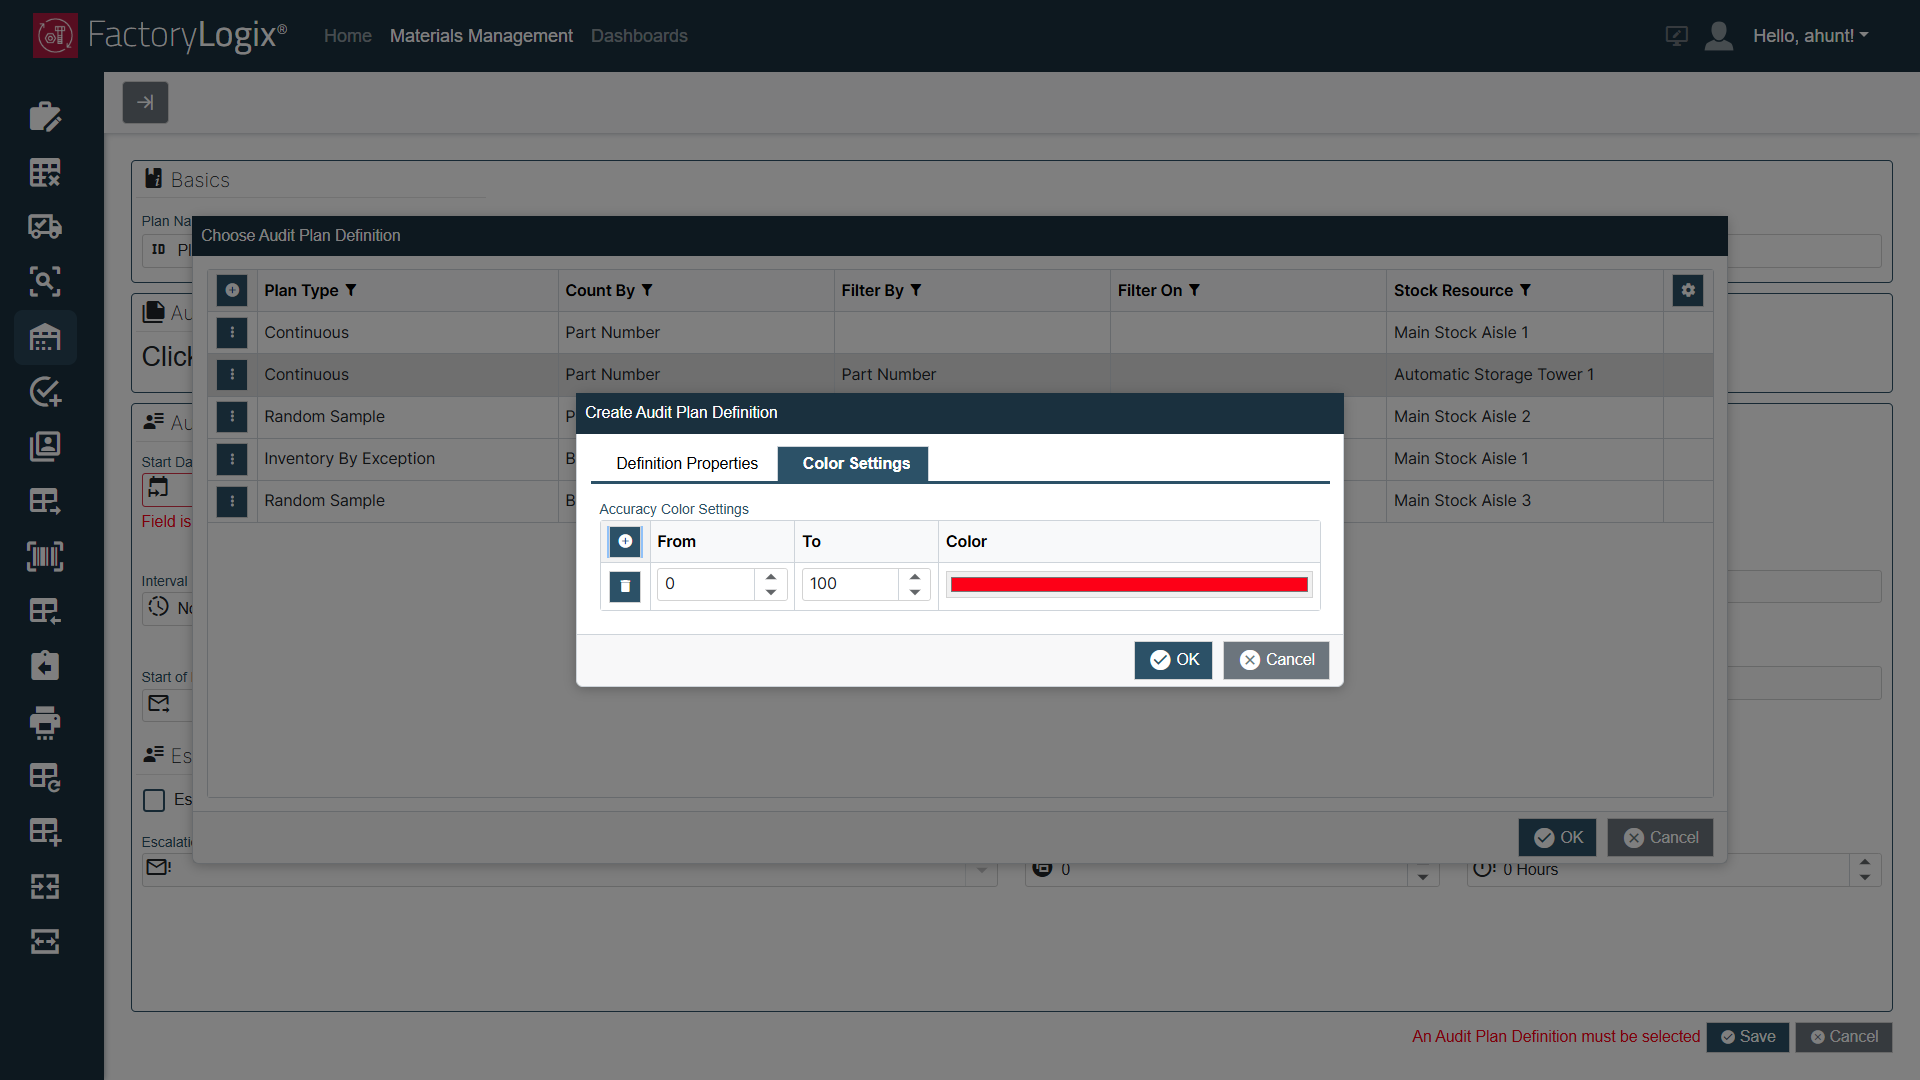
You can define multiple percentage ranges to set a specific color against and add as many ranges as necessary using the Add ![]() button.
button.
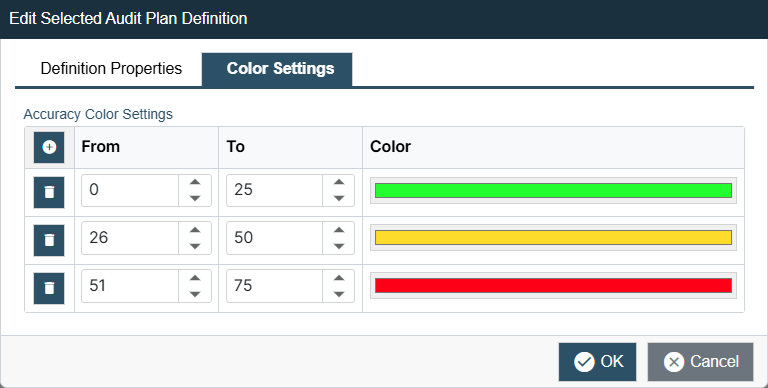
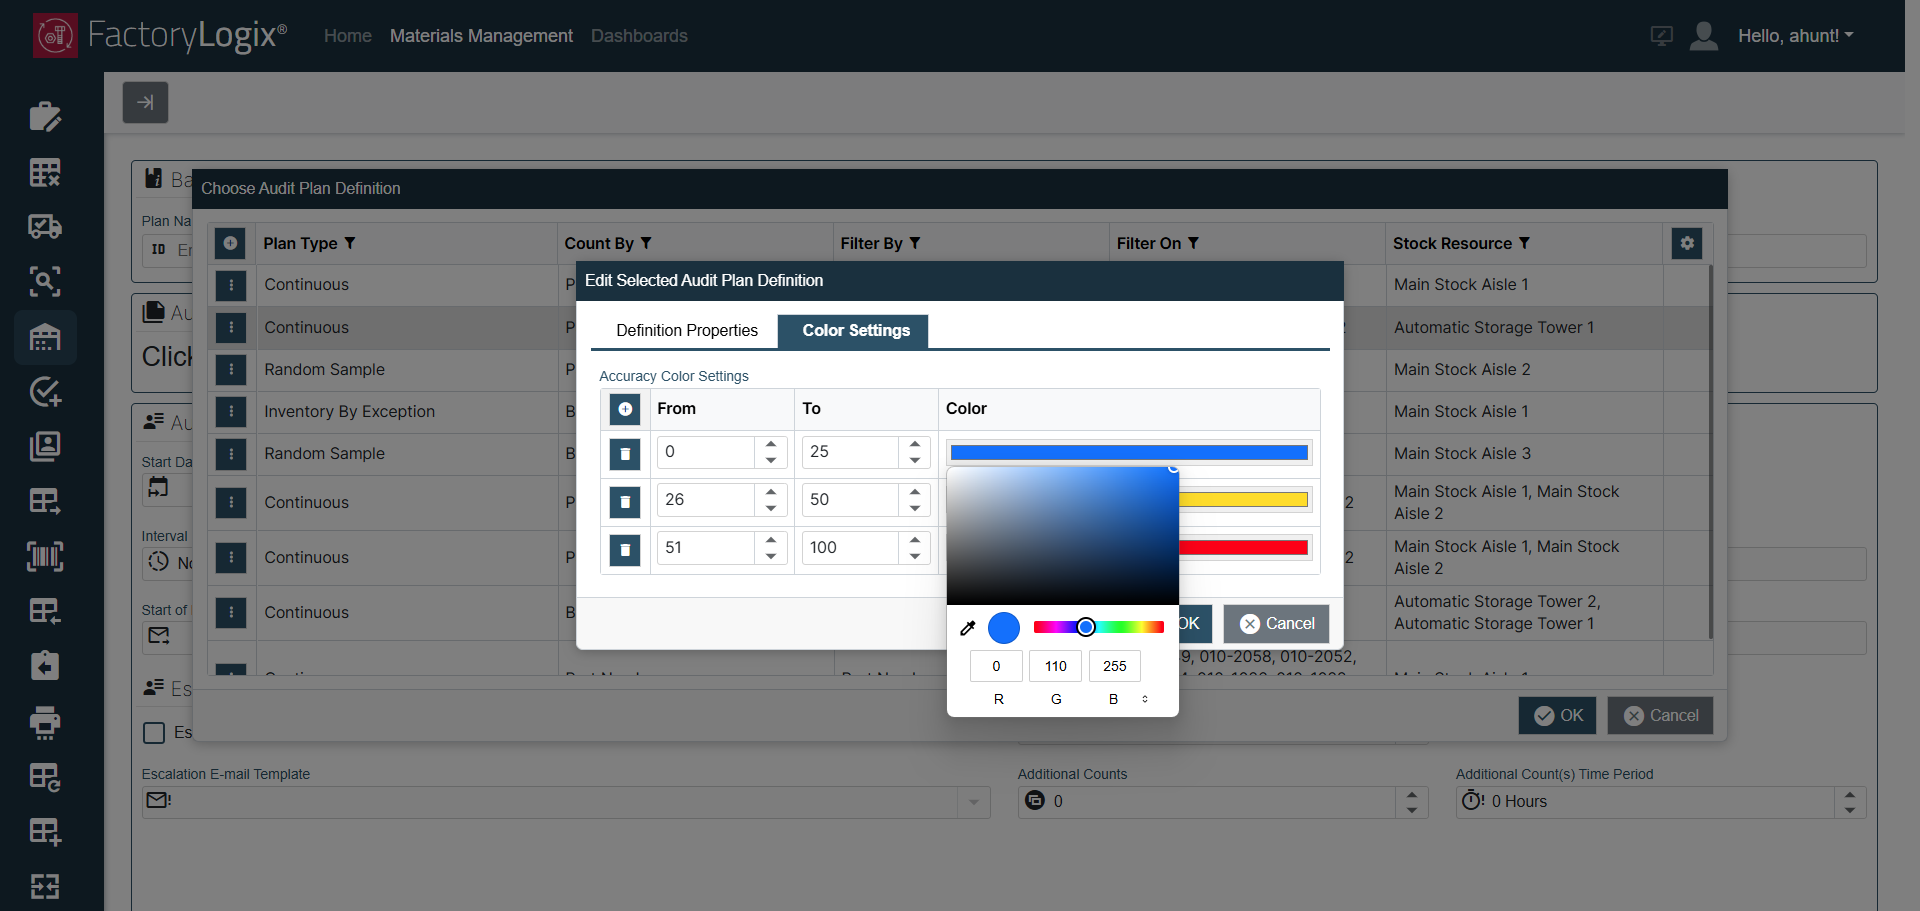
To change the color for a percentage range, select the color bar, then drag to specify a new color or enter the desired RGB values if you know them.
When you’re finished specifying color settings, select OK to return to the Choose Audit Plan Definition dialog.
Select OK to return to the Audit Plan window.
Under Audit Plan Details, select the calendar button next to Start Date and End Date to specify the start and end dates for the audit plan.
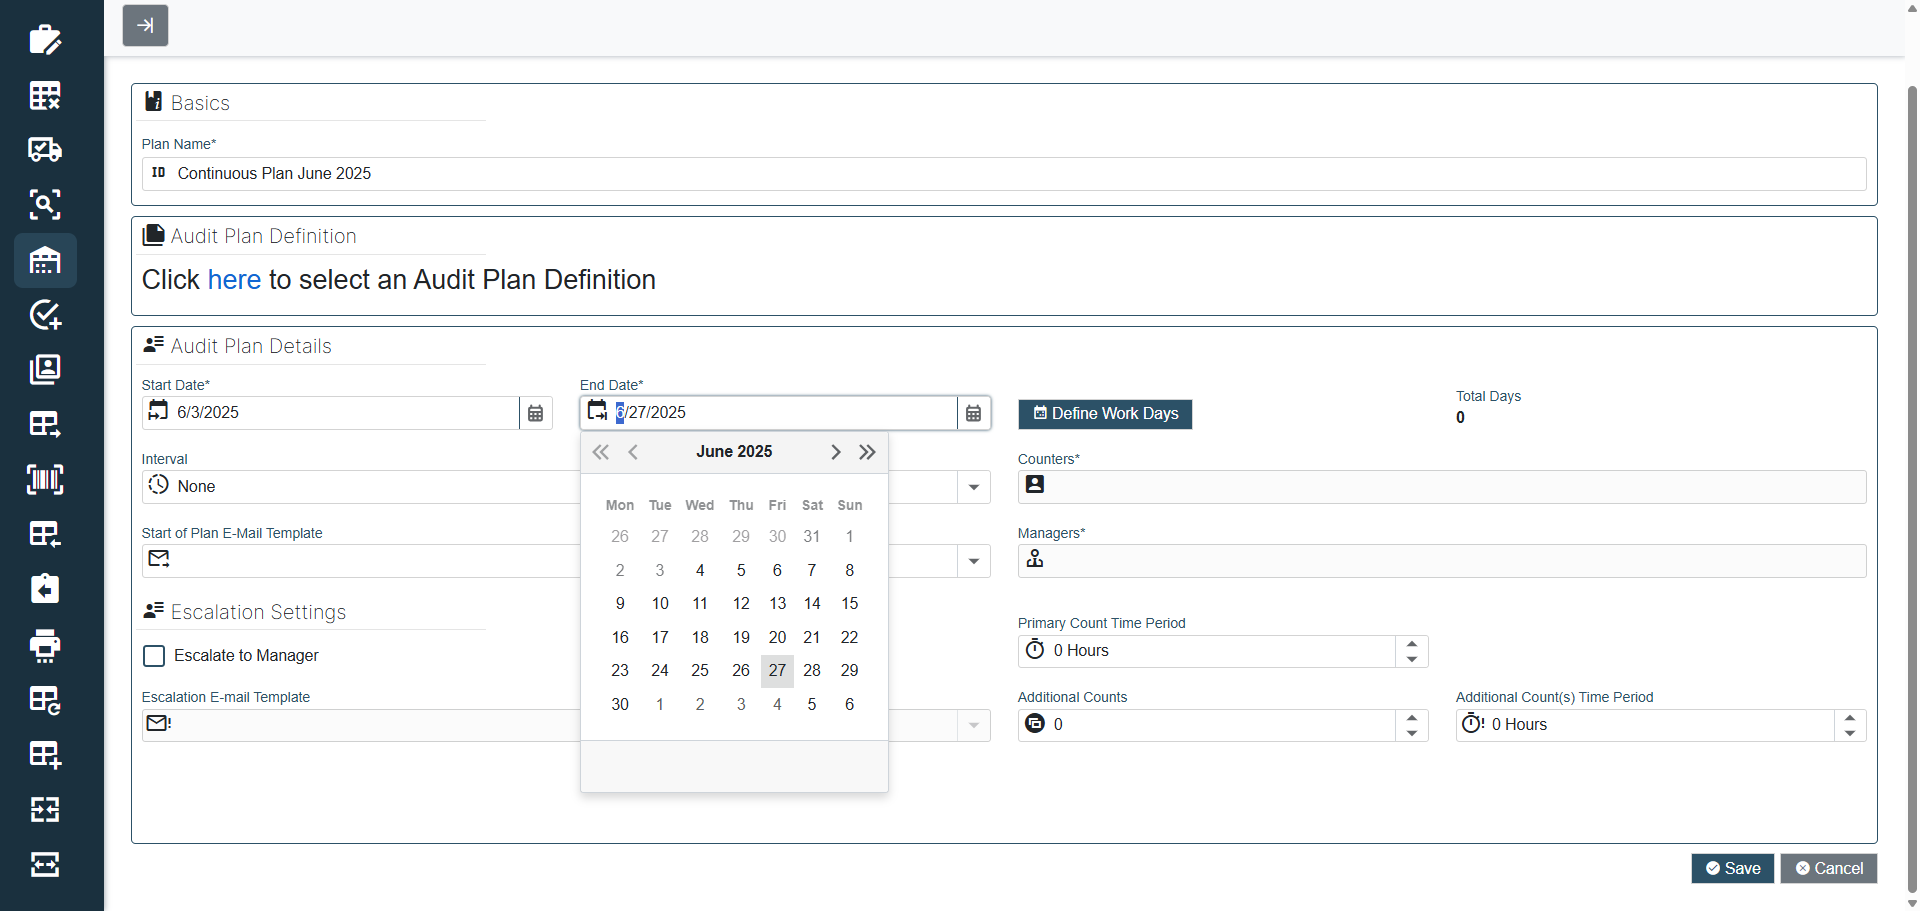
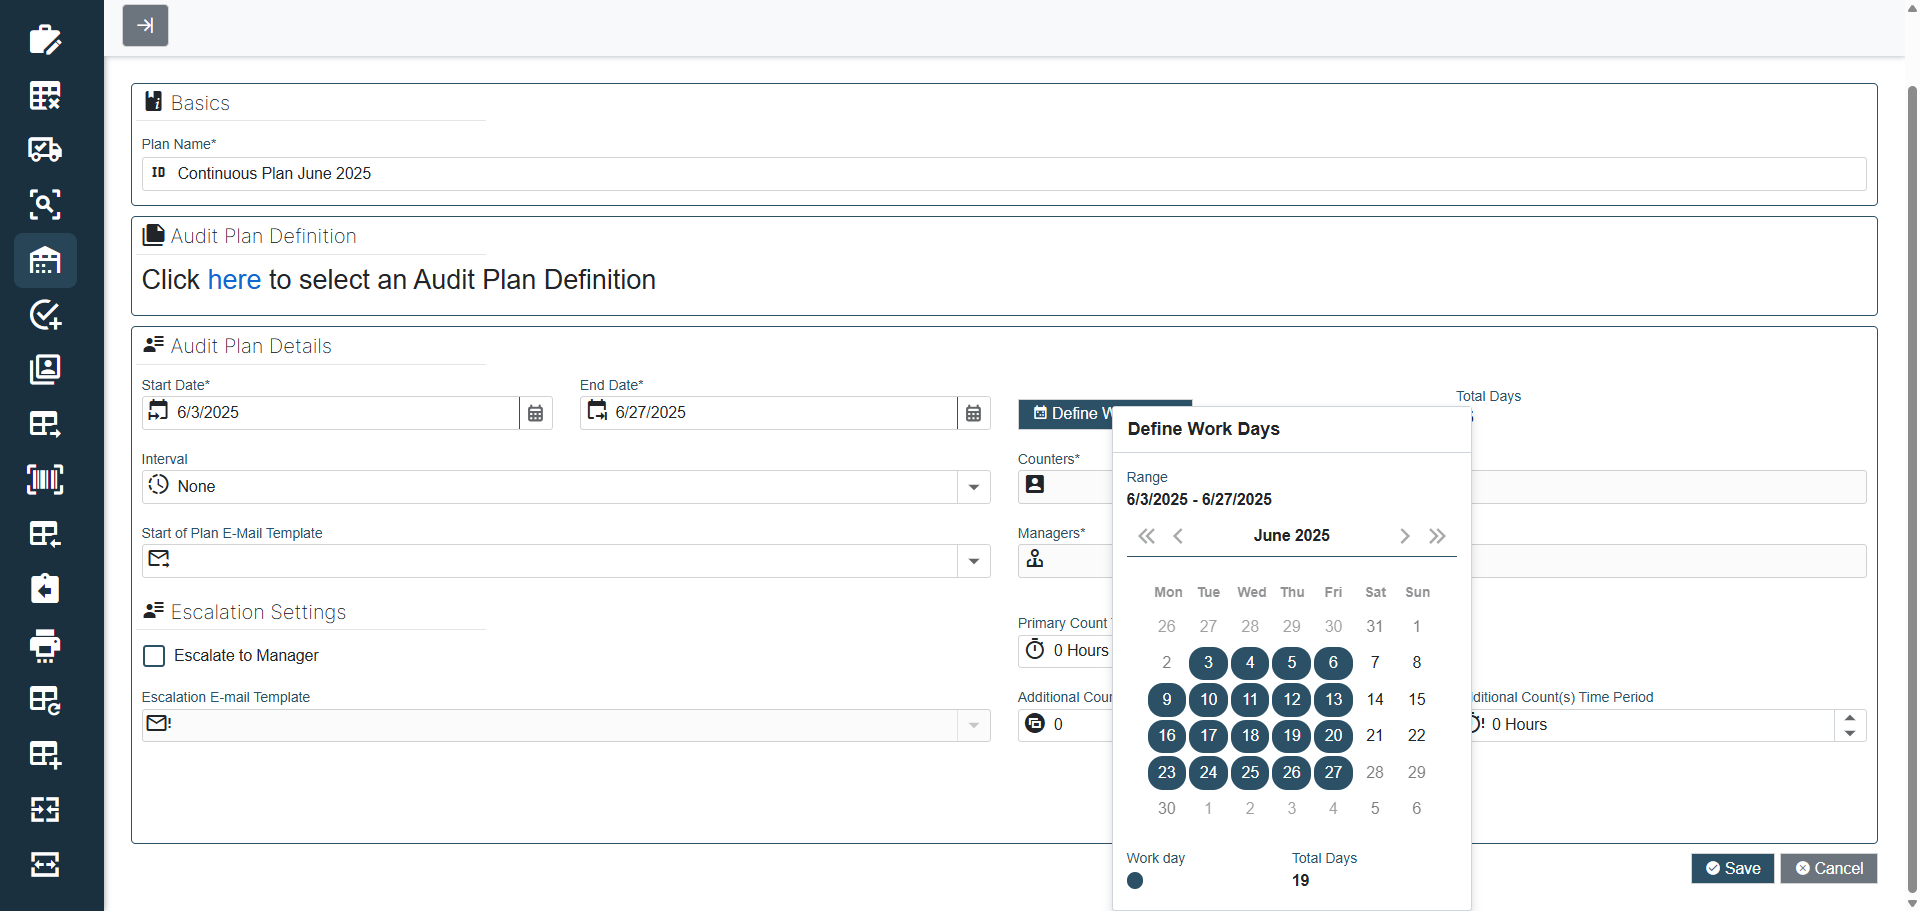
Select Define Work Days, then select/deselect specific days for the audit plan. For example, if you want to eliminate weekend days, select Saturday or Sunday dates in the date range you specified for this plan to eliminate specific Saturday and/or Sunday dates.
Saturday and Sunday dates in the audit plan range were deselected in the following example so that only weekdays will be used in the audit plan.
Note
Two global options help define specific workdays. You can specify these global options in FactoryLogix Office (see FactoryLogix global options ).
Include Weekends in Audit Plans – This option defaults to False which excludes weekends from the workday selector initially. When set to True, this option includes weekend days in the workday selector. (Both cases can be overrider by the planner when selecting the workdays for the plan.)
Define the First Day of the Week – As the first day of the week defined can vary per organization, this option gives the audit planner the ability to set the expected first day of the week to help when defining the start date for an auditing interval. Since Monday is the typical start of a work week, it is the default value.
Under Interval, use the dropdown to select the interval counters will use for the audit plan: Daily, Weekly, Monthly, or Quarterly.
Select the Counters field to display a dialog where you can select one or more individuals who will perform the counting tasks for this audit plan.
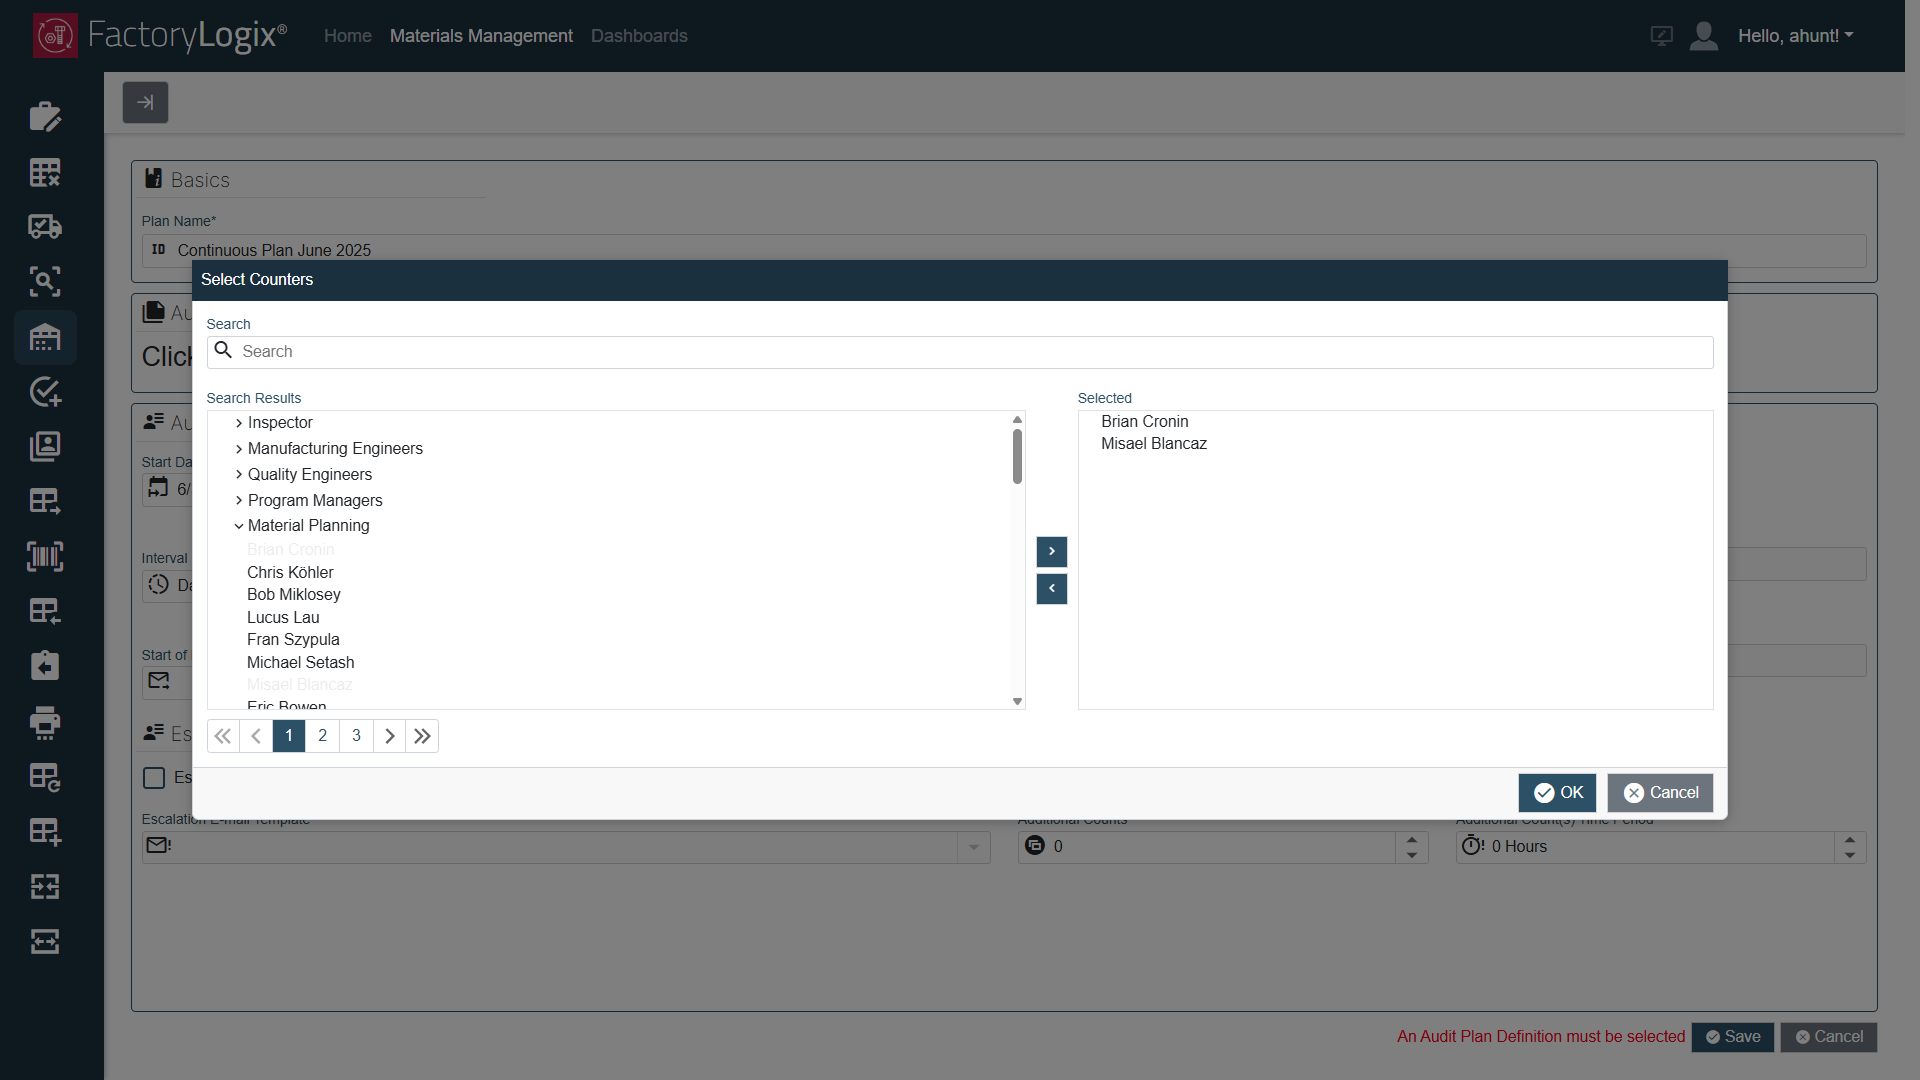
Use the right and left arrow buttons
to move counters to the Selected (right) side of the dialog.When you finish selecting counters, select OK to return to the Audit Plan window to finish setting up the audit plan.
Select the Search box at the top of the dialog if you want t o search for specific people to assign as counters for this audit plan.Under Managers, make your selections using the instructions in Step 22 and Step 23 to specify one or more people who will manage the audit plan, then select OK to return to the Audit Plan window. (Audit plan managers are responsible for managing the plan and forming a diagnosis based on the audit task results.)
Under Primary Count Time Period, select the desired count time period (in hours) for this plan.
This setting defines the duration of time (in hours) that the first count is expected to be completed within that interval (doesn’t apply to Inventory By Exception plans).Under Additional Counts, select the number of additional inventory counts the counters should perform, then specify the Additional Count(s) Time Period (in hours).
This setting defines the duration of time (in hours) that any additional counts are expected to be completed within that interval.Under Start of Plan E-Mail Template, select the template to be used to send to alert plan participants when the audit plan is about to start.
Both counters and managers defined in the audit plan are alerted.
Note
You can define E-Mail templates in FactoryLogix Office > Templates and Standards > E-Mail Templates.
Under Escalation Settings, select the Escalate to Manager checkbox to urn on escalation counts to a manager.
When turned on, any inventory count mismatches recorded by the counter(s) in the initial count(s) will require a manager to verify a count result by performing a count themselves. When this checkbox is selected, it activates the Notification email to be sent to the manager requesting they perform a count task to verify the count.If the Escalate to Manager checkbox is turned on in the previous Step, select an escalation email template using the Escalation E-Mail Template dropdown.
Only audit plan managers will be notified when you select Escalate to Manager.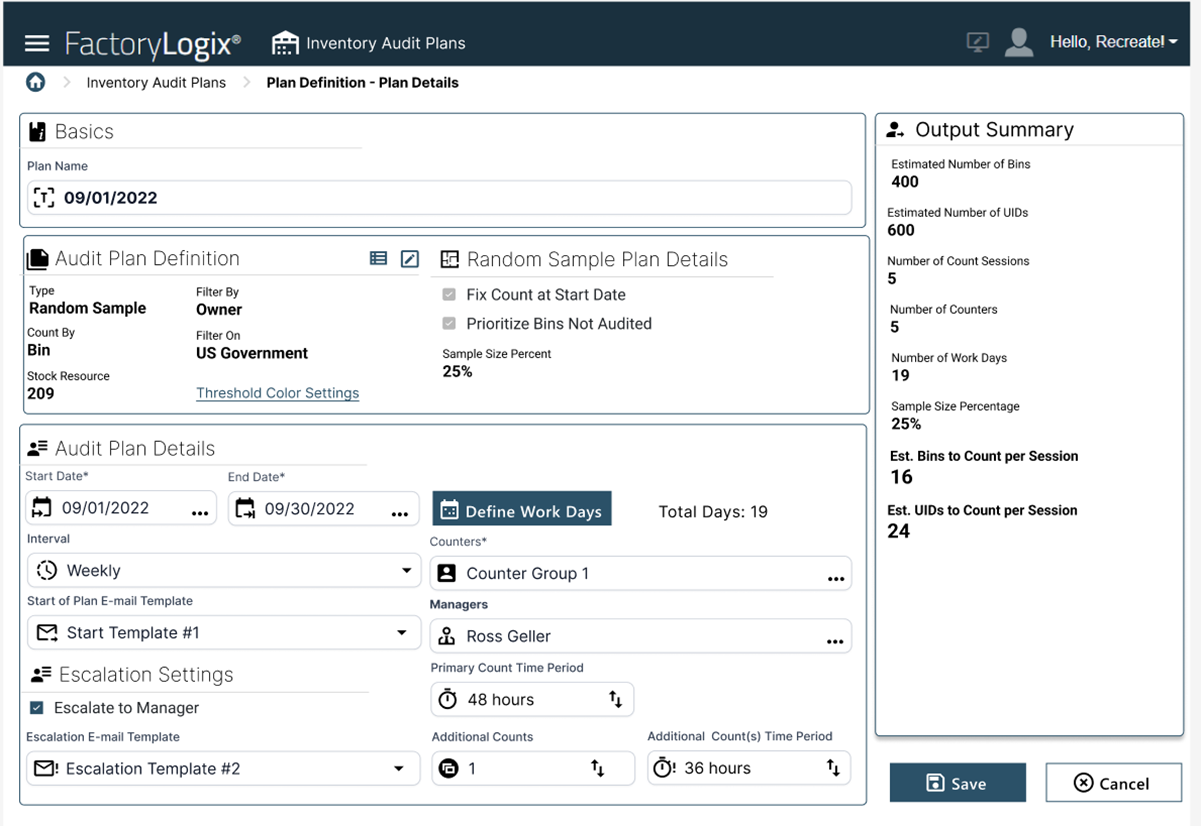
After reviewing your audit plan definition settings, select Save to return to the main window. Your new audit plan will display in the grid under the Audit Planning tab.
Output Summary view
After you save a new audit plan definition, you’ll see the values displayed in the Audit Plan Definition area of the Audit Plan window.
If you selected a Random Sample or Continuous audit plan type, the pool of inventory results of this initial filtering step shall also be calculated and displayed in the Output Summary area on the right side of the Audit Plan window.
The output summary values can help you define the details of an audit plan by understanding the pool of inventory to be counted.
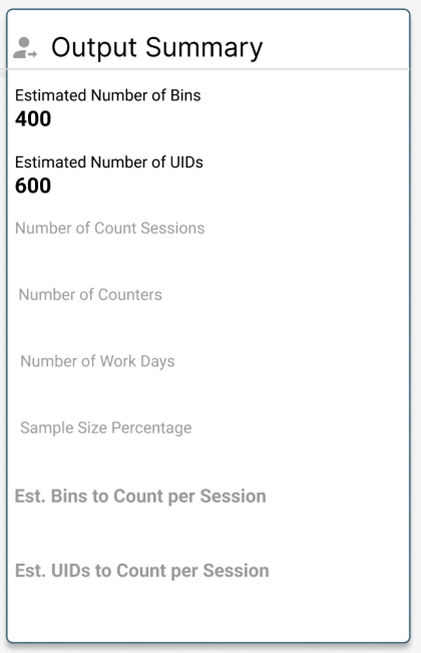
The Count By field determines what data is displayed in the Output Summary:
If the plan is configured to count by bin, the Output Summary displays the Estimated Number of Bins and Estimated Number of UIDs.
If the plan is configured to count by Part Number, the Output Summary displays the Estimated Number of Part Numbers, Estimated Number of Bins, and Estimated Number of UIDs.
If the Plan Type is configured as Random Sample, the Sample Size Percentage will be displayed and populated (for other plan types, this property is hidden).